Basics
Phoenix II —FAQ (IOS)

BOOKMARK
FAQ (IOS) by light_rock_zz
Version: 5.3 | Updated: 07/29/2025
FAQ of the Month Winner: January 2020 | Highest Rated Guide
Basics
Game Interface & Controls | ||||
|---|---|---|---|---|
| Controls | Gameplay Interface | Warp Gate | Phoenix Revives | Firi Account |
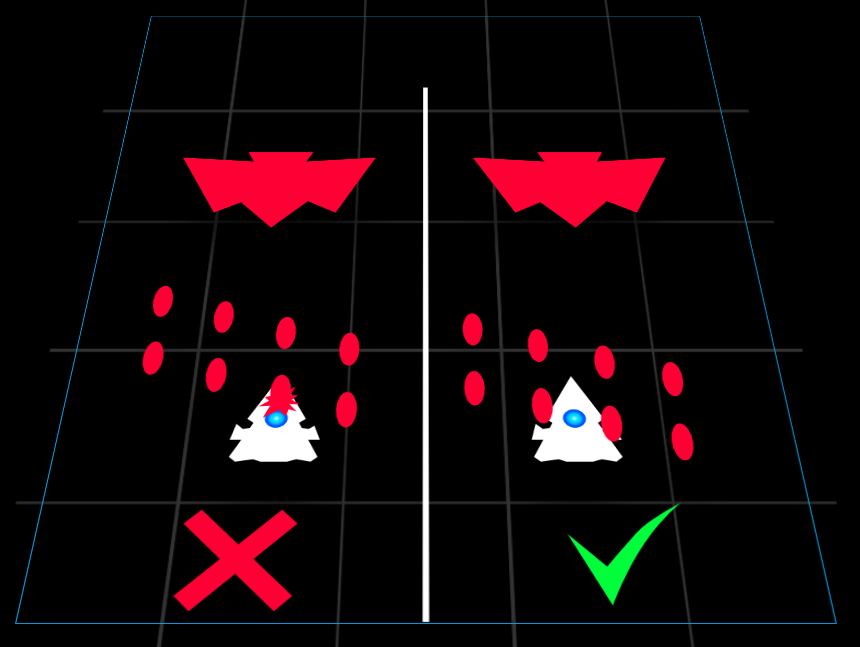
You can only be killed if a bullet or laser hits your ship core. The rest of the ship is visual and does not matter.
Controls
Touchscreen
- The ship follows your relative touch.

- Lifting your finger from the screen and repositioning your touch does NOT cause your ship to jump to the new spot you tapped at.
- Instead, the ship simply follows any new movement from the new touch point.
- Use a second finger (while your first finger is still in contact with the screen) to tap to activate Aura
 .
.
- Release your touch on the screen to charge a Zen
 .
.- Not re-engaging touch on the screen will immediately start charging a second round of Zen for Zens that go off automatically once fully charged. E.g. Reflex EMP
 , Focus Lance
  , etc.
 - To trigger a Zen that requires manual activation after fully charged (E.g. Mega Bomb
 , Mega Laser
  ), re-engage touch on the screen.
 - For Teleport
 , where you tap on the screen to re-engage touch is where your ship will teleport to.
- Not re-engaging touch on the screen will immediately start charging a second round of Zen
Controller
Can be used for ALL platforms (Android, iOS, Mac & PC), if connected.
- This is the ONLY fully functional controls for the Mac OS version.
- Unlike Mobile controls, you are considered to be actively piloting your ship at all times by default.
- In other words, with Controller connected, it is as if your finger is always in contact with the screen, but not moving.
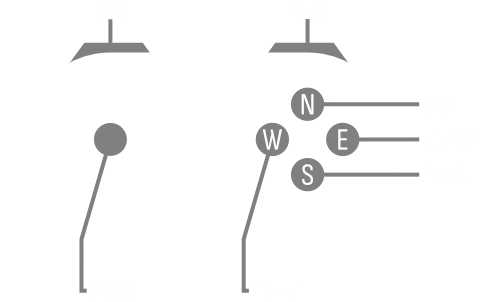
- Use the Joystick (shown on the left side of the above diagram) to move your ship around.
- Activate Aura by pressing either the Right Shoulder button or the Bottom button (The S button in the above picture)
- To charge a Zen , hold on to the Left Shoulder button or the Top button (The N button in the above picture).
- Continuing to hold on to the Zen button will immediately start charging a second round of Zen for Zens that go off automatically once fully charged. E.g. Reflex EMP , Focus Lance , etc.
- To trigger a Zen that requires manual activation after fully charged (E.g. Mega Bomb , Mega Laser ), let go of the button for charging a Zen.
- For Teleport , use the Joystick to move to the location you want to go to after using Teleport while holding down the Zen button, and then let go of it. A translucent image of the ship shows you where the ship will be after releasing the Zen button.
- Continuing to hold on to the Zen
- Hold on to the Left button (The W button in the above picture) to decrease movement speed for fine movement.
- Hold on to the Right button (The E button in the above picture) to increase movement speed.
PC offers 2 ways to pilot your ship, Keyboard and Mouse Controls.
Keyboard
- Unlike Mobile Controls, you are considered to be actively piloting your ship at all times by default.
- It is as if your finger is always in contact with the screen, but not moving.
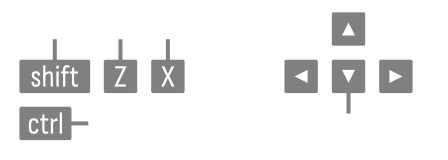
- Use the Arrow Keys (↑, ↓, ←, →, as shown on the right side of the above diagram) to move your ship around.
- The WASD keys do NOT work to move around.
- Activate Aura by hitting the X key.
- To charge a Zen , hold on to the Z key.
- Continuing to hold on to the Z key will immediately start charging a second round of Zen for Zens that go off automatically once fully charged. E.g. Reflex EMP , Focus Lance , etc.
- To trigger a Zen that requires manual activation after fully charged (E.g. Mega Bomb , Mega Laser ), let go of the Z key to activate the Zen.
- For Teleport , use the Arrow Keys (↑, ↓, ←, →) to move to the location you want to go to after using Teleport while holding down the Z key, and then let go of it. A translucent image of the ship will show you where the ship will be after releasing the Z key.
- Continuing to hold on to the Z key will immediately start charging a second round of Zen for Zens that go off automatically once fully charged. E.g. Reflex EMP
- Hold on to the Shift key to decrease movement speed for fine movement.
- Hold on to the Ctrl key to increase movement speed.
- You can use Keyboard controls for Mac OS, but since Mac keyboards don't have a Ctrl button (the Control ∧ button doesn't count and doesn't work in this case anyway), you CANNOT use Boost.
- It won't work even if you connect an external keyboard that has a Ctrl button, as Mac OS simply uses the Ctrl button as Mac's Control ∧ button, which doesn't work in this game. There's just no way to configure any key to work as a Ctrl button natively inside Mac OS.
Mouse
- Unlike Mobile Controls, you are considered to be actively piloting your ship at all times by default.
- It is as if your finger is always in contact with the screen, but not moving.
- Your ship follows the movement of your mouse.
- This is subject to the In-Game Mouse Speed which is adjustable anywhere from 50% to 150% in the Settings menu.
- Your mouse's DPI settings will also affect this. The higher the DPI, the faster your ship can move around.
- Note that there is a maximum ship movement speed, so setting your In-Game Mouse Speed or Mouse DPI beyond a certain limit may not be ideal as your ship will need to catch up to your movements.
- When this happens, the Mouse Movement Cursor (as shown below) will appear. This cursor shows where your ship core will ultimately be after your ship has caught up with your mouse movements.

- When this happens, the Mouse Movement Cursor (as shown below) will appear. This cursor shows where your ship core will ultimately be after your ship has caught up with your mouse movements.
- Activate Aura by hitting the Left Mouse Click.
- To charge a Zen , hold on to the Right Mouse Click.
- Continuing to hold on to the Right Mouse Click will immediately start charging a second round of Zen for Zens that go off automatically once fully charged. E.g. Reflex EMP , Focus Lance , etc.
- To trigger a Zen that requires manual activation after fully charged (E.g. Mega Bomb , Mega Laser ), let go of the Right Mouse Click to activate the Zen.
- For Teleport , use the mouse to move to the location you want to go to after using Teleport while holding down the Right Mouse Click, and then let go of it. A translucent image of the ship will show you where the ship will be after releasing the Right Mouse Click.
- Continuing to hold on to the Right Mouse Click will immediately start charging a second round of Zen for Zens that go off automatically once fully charged. E.g. Reflex EMP
- Unlike keyboard controls, there is no way to slow down or speed up your movement speed.
- These controls don't work properly on a Mac's trackpad.
ALL controls can be used at the same time.
- However, there are some restrictions to movement control schemes.
- Mobile controls can always be used together with all other movement control schemes.
- If you want to swap to Mouse movement from either Mobile, Controller or Keyboard controls, you must hit either Left Mouse Click or Right Mouse Click first.
- Arrow Keys (↑, ↓, ←, →) take priority over Controller joystick movement.
- Meaning, using the Arrow Keys will always interrupt movement inputs from the Controller joystick, but Controller joystick inputs CANNOT interrupt movement inputs via Arrow Keys.
- The Keyboard Shift key or the Controller Left button (Brake, decrease movement speed) & the Keyboard Ctrl key or the Controller Right button (Boost, increase movement speed) affect movement speeds for only Controller and Keyboard control schemes.
- Using a mouse is the most precise way to pilot your ship.
- You can adjust the In-Game Mouse Speed for the Mouse control scheme in Settings, but there are no modifiers for movement speed.
- Remember that your Mouse's DPI settings (which is not set in-game) also matter. If you don't know what that is, then you probably don't need to bother since it's usually specific to gaming mice.
- Otherwise, Mobile controls are the next best control scheme.
- Refrain from using a trackpad (go and find out why).
- You can EITHER use a second screen Tap (Mobile controls), the X key or the Left Mouse Click to activate Aura
- You can hold down EITHER the Z key and the Right Mouse Click to charge Zen
- Holding down BOTH has no additional effect. However, you can let go of the first one (while still holding the second one) and the charging can still continue.
- You may use Mobile controls to let go of all inputs to start charging Zen
- In this case, letting go of all of the Z key and the Right Mouse Click will result in the Zen
- Obviously, since Mobile controls require that there are no touch inputs, you cannot transit to using Mobile controls to continue charging a Zen
- Thus, you can use the Left Mouse Click to activate Aura
Trivia: There was a bug in a pre-Early Access release which allowed you to activate Aura even while charging Zen. This was achieved by using the Z key to charge Zen first, then using the Left Mouse Click to activate the Aura. Alternatively, it could also be achieved by using the Right Mouse Click to charge Zen first, then using the X key to activate Aura. This exploit was discovered on February 2, 2025, and was quickly patched by the devs on the same day. Here's a playlist showcasing how broken the exploit was:
https://www.youtube.com/playlist?list=PLaRb57eN7IqdkM7wPz3uFkV8vuc6gtqEy
Gameplay Interface
Mobile
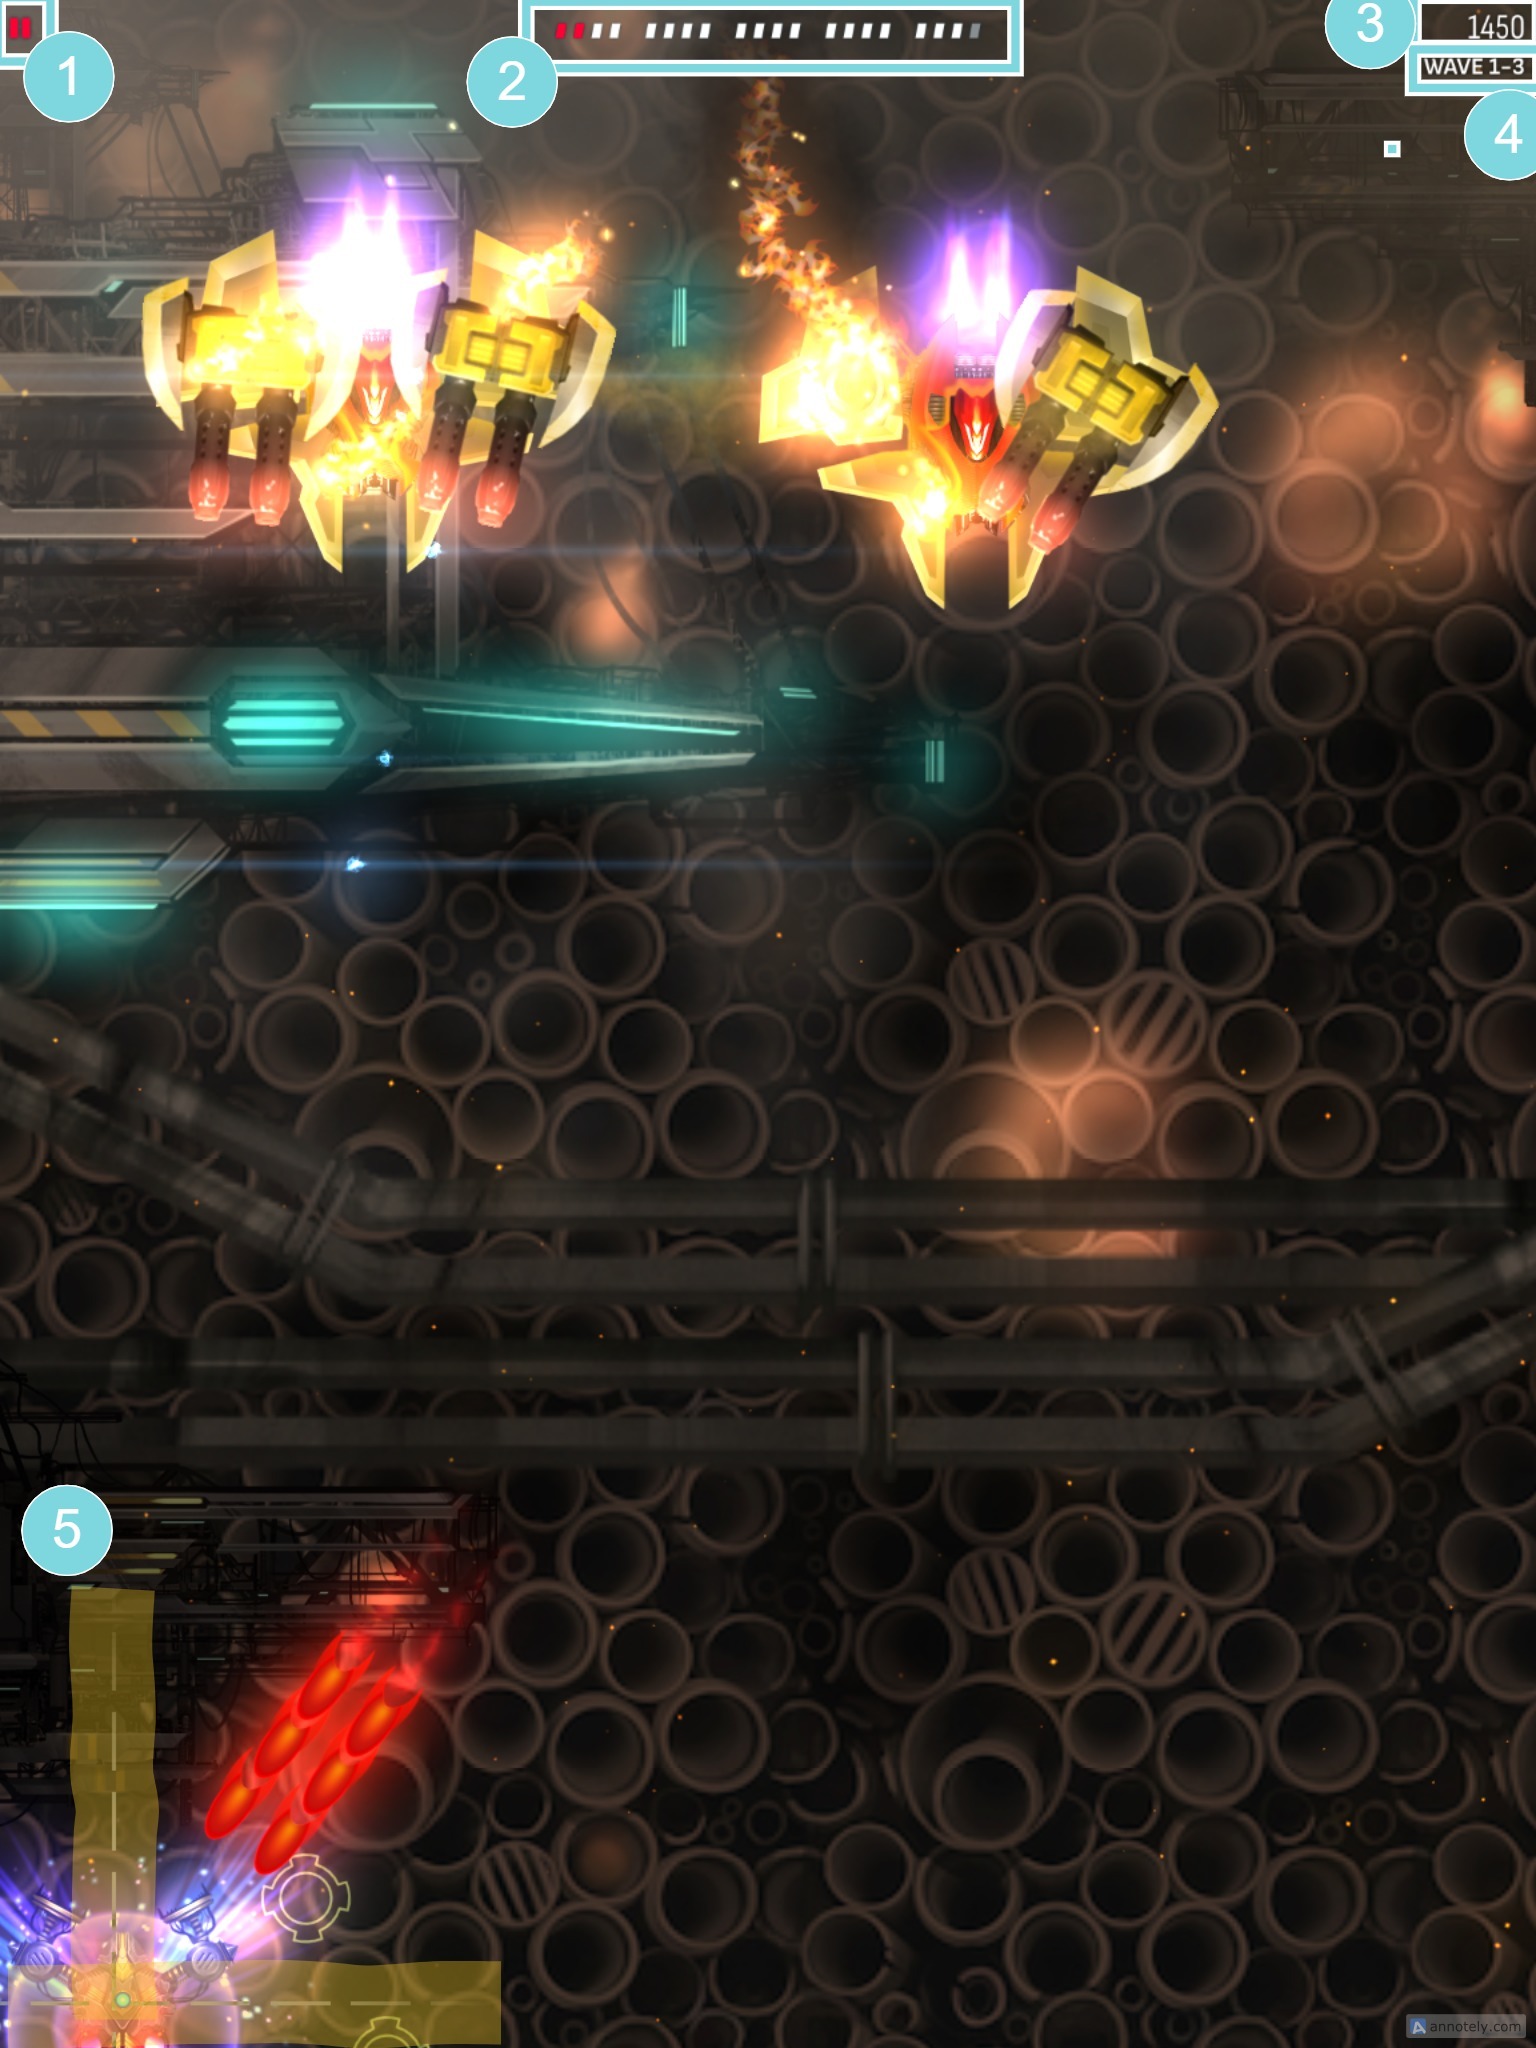
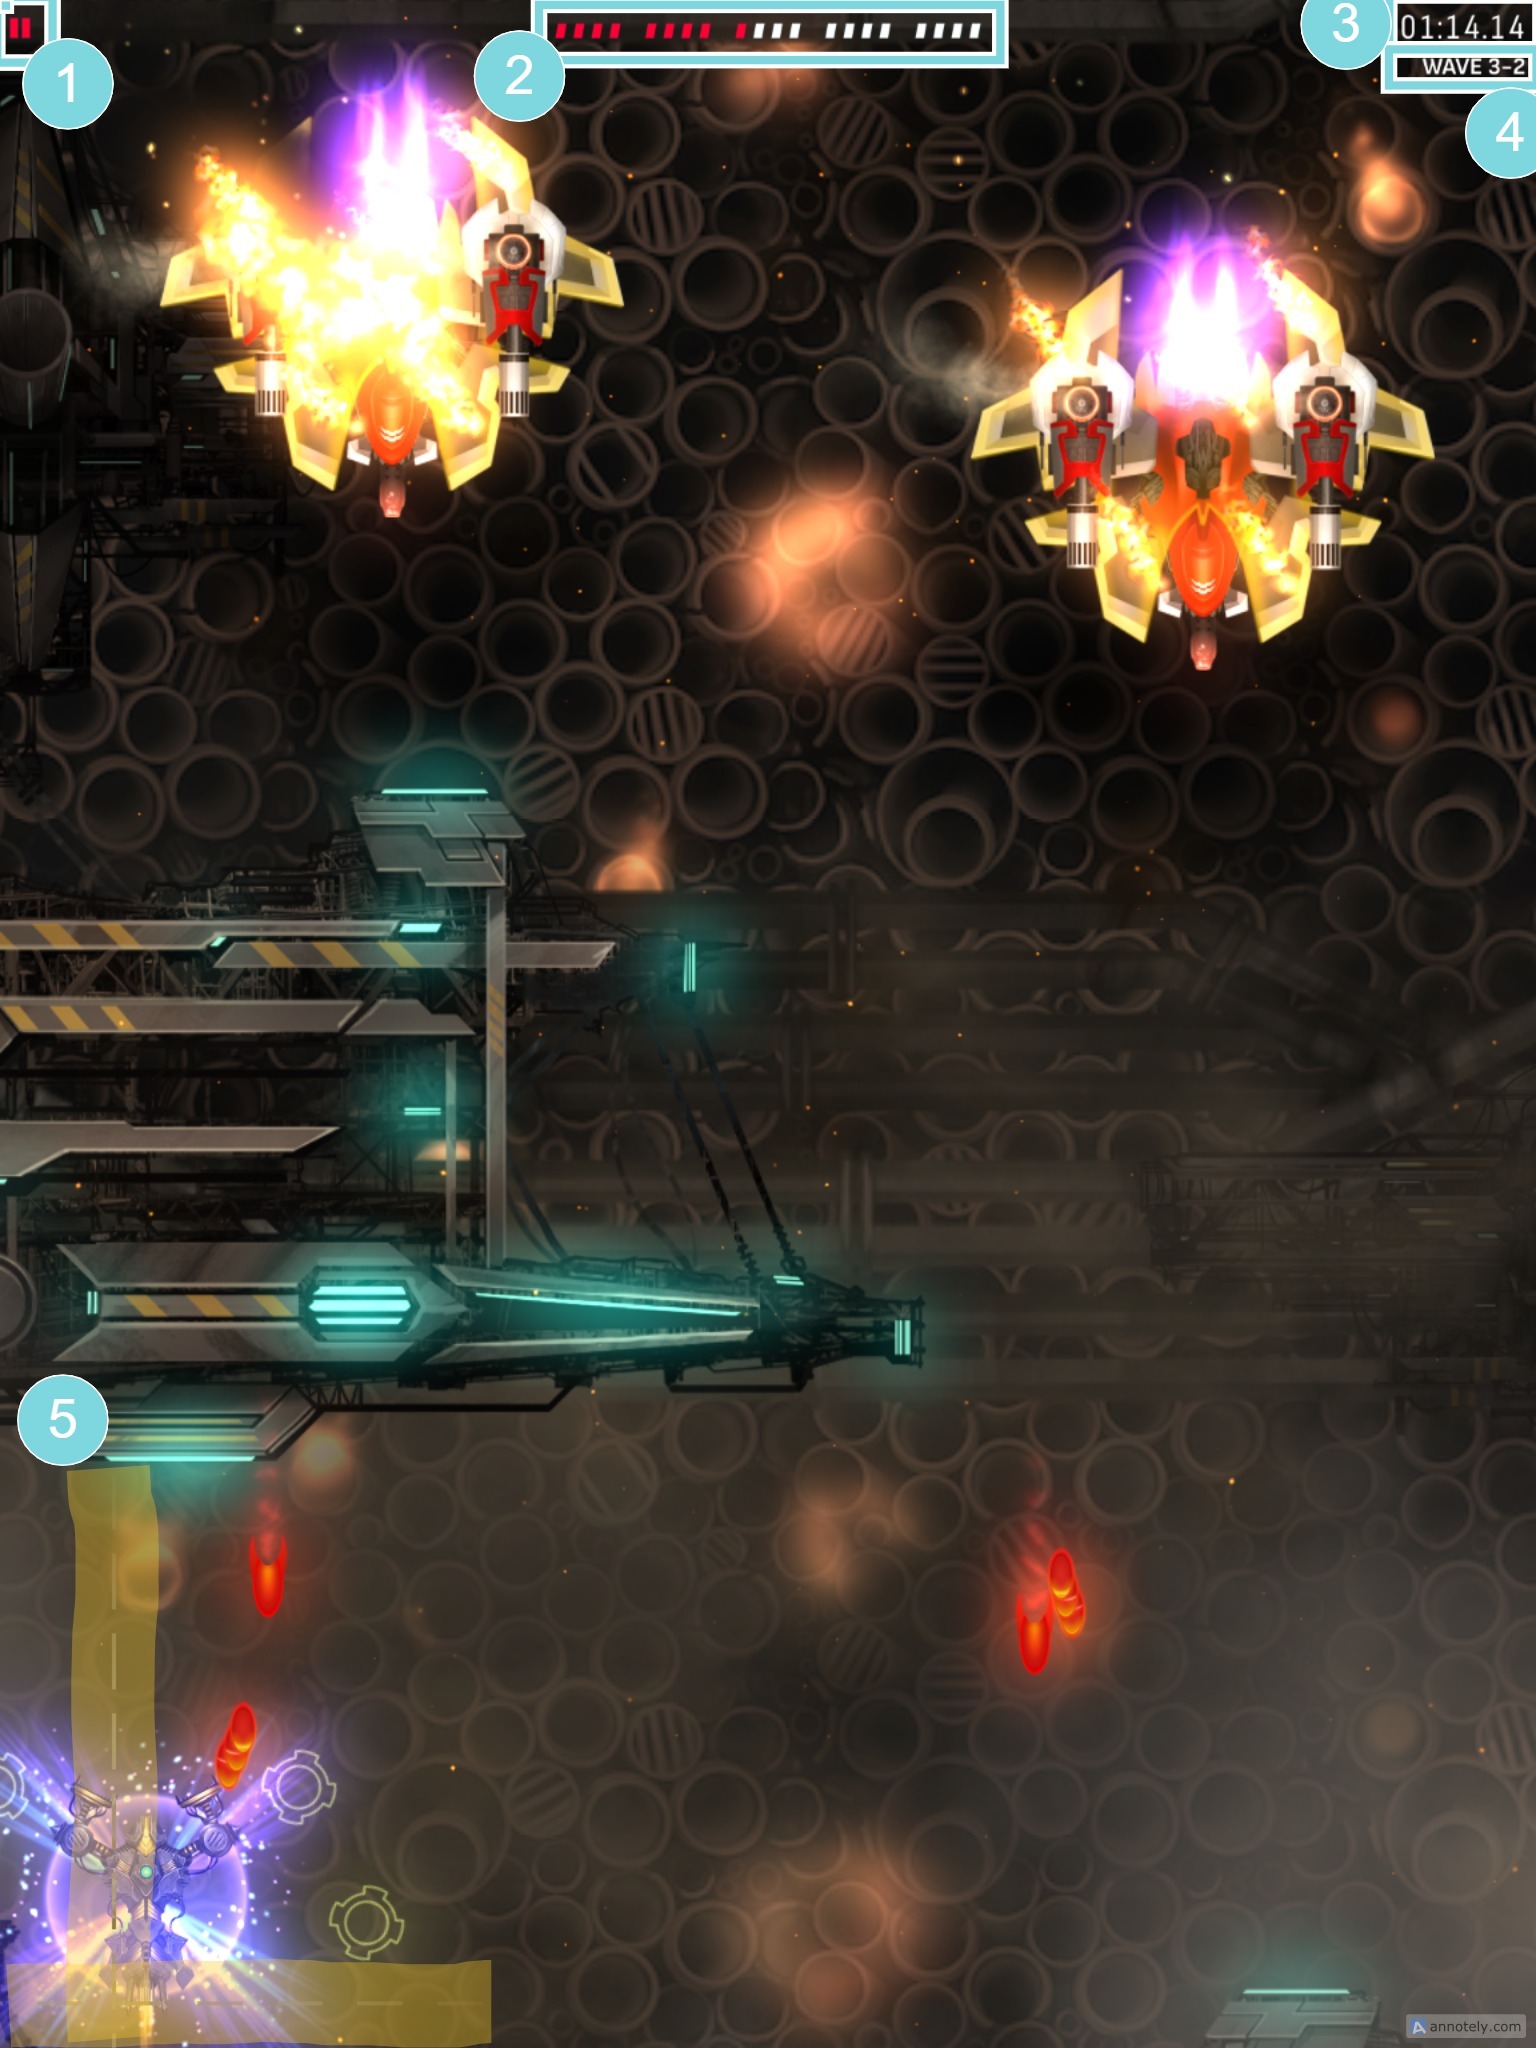
- Pause Button. I wonder what it does...
- Mission Progress Bar. Divided into groups of 4, which represent one Act. Each shape represents one wave.
- A red shape indicates a cleared wave in this attempt.
- A white shape indicates this wave was cleared before in previous attempts, but not cleared in this attempt.
- A greyed shape indicates a wave you have never cleared before.
- Score (1st Screenshot) / Time (2nd Screenshot).
- Shows Score (which increases as Invaders are destroyed) if the current mission has never been fully cleared before.
- Shows Time if the current mission has been fully cleared before
- Wave Indicator. Shows the current wave you are on.
- Borders. These define the playing area you are allowed to move, and only appears when you are close to them.
PC
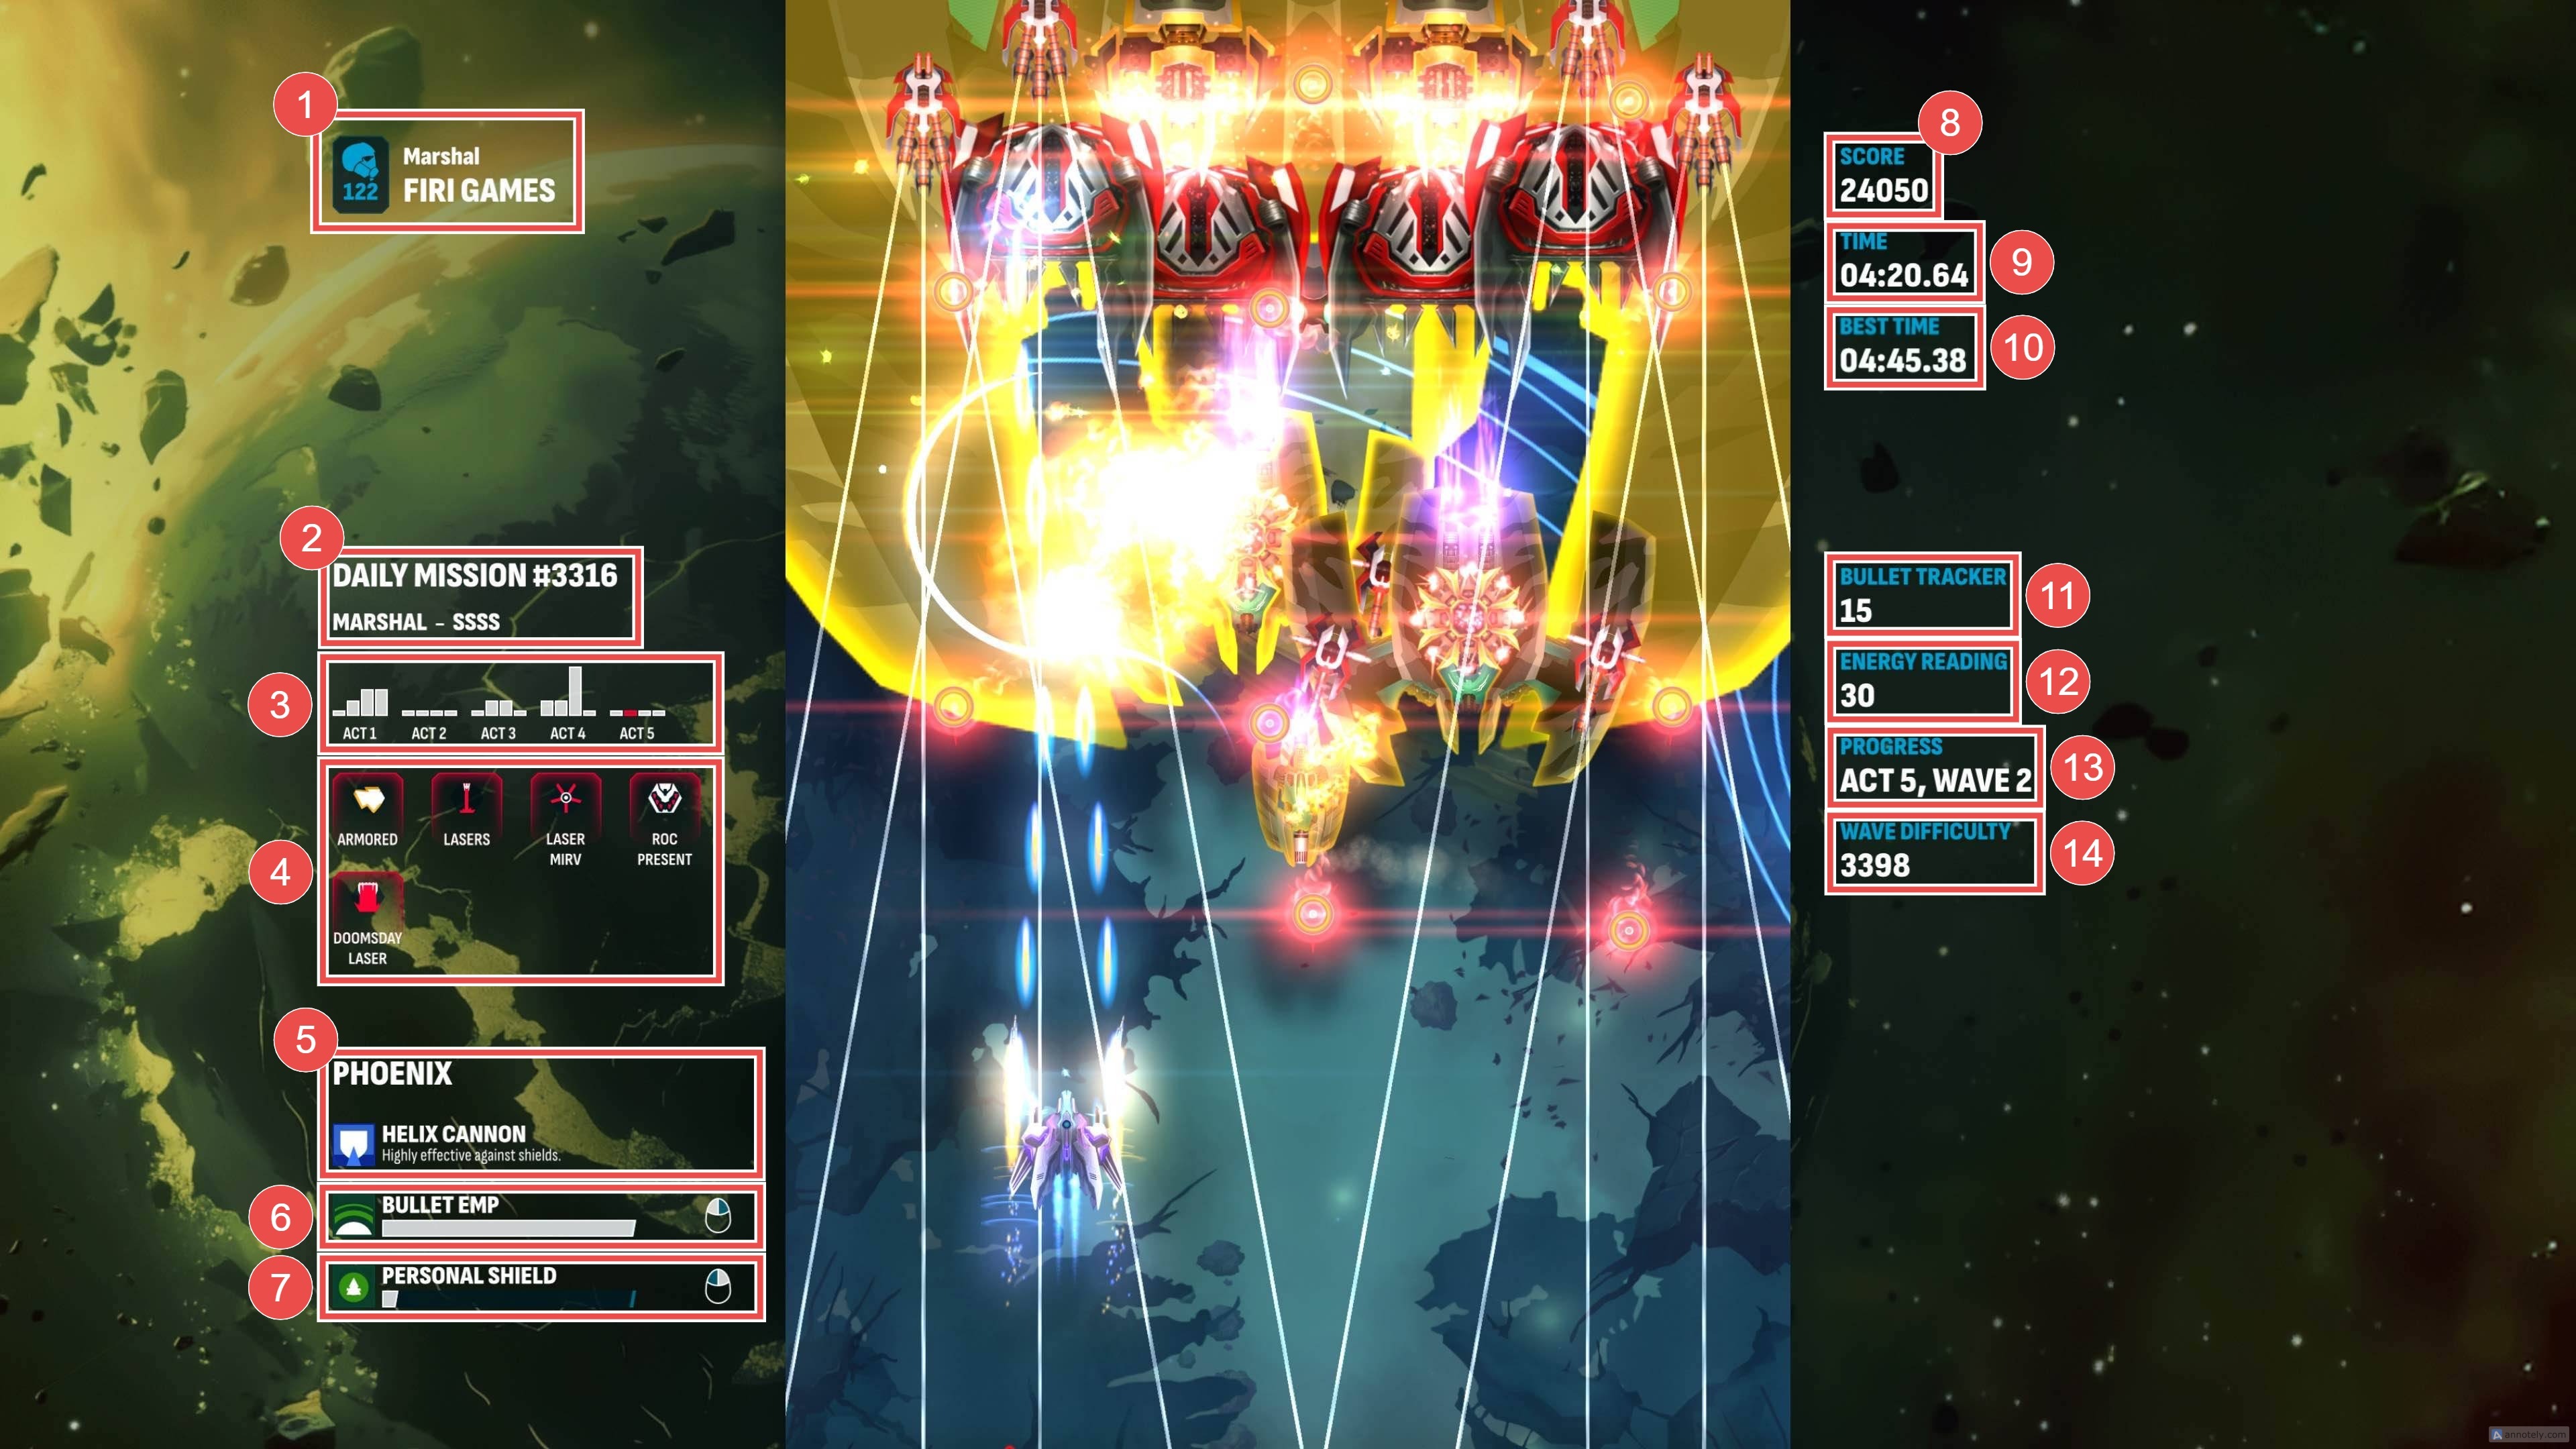
- Your Pilot Details. Includes:
- Pilot Level
- Pilot Name
- Rank
- Current Mission Details. Includes:
- Type of mission (Daily
 , Specialist
  or Community
  )
) - Rank (Rookie
 to Marshal
  ). Applicable only for Daily & Specialist missions.
 - Tier (D, C, B, A, S, SS, SSS, SSSS). Applicable only for Daily & Specialist missions.
- Type of mission (Daily
- Wave Difficulty bar chart distribution.
- Same as the one you see when you open up the leaderboards for a mission.
- Mission Intel.
- The ones with a red border indicate the weaponries or Invaders present in the current wave.
- Currently used ship (including Apex
 tier if applicable) and main weapon
  (including damage type - High Impact
  , Shield Breaker
  or Armor Piercing
  ).
). - Aura Energy Bar. Shows the Aura trigger key.
- Zen Charge Bar. Shows the Charge Time Increase
 (if applicable) and Zen charge key.
 - Score. Increases as Invaders are destroyed.
- Time. The time you clocked just as you entered this wave.
- Best Time. Your previous best time clocked at the point this wave was fully cleared. Shows up only if you cleared all waves of the current mission before.
- Bullet Tracker. The number of bullets on screen.
- MIRVs and Super MIRVs are counted as 1 bullet until triggered.
- Each laser warning line is counted as 1 bullet. This also includes those from laser MIRVs after triggered.
- The white pulses of lasers are counted as 1 bullet just before the laser turns deadly.
- This explains why the bullet tracker temporarily jumps up just before lasers turn deadly, and then goes back down again.
- Energy Reading. The total amount of energy on field, determined by the energy provided by the particles on field.
- Progress. The wave you are at now.
- Wave Difficulty. The cumulative difficulty of the current wave, based on arbitrarily assigned difficulty values applied on all turrets on the Invaders of the current wave.
- Does not update as turrets or Invaders are destroyed. Only updates at the start of the next wave.
- Each wave stays the same difficulty until the mission is reset.
Unlike Mobile, your ship (or the ship core) is allowed to move anywhere within the playing area as your screen and the background fillers define the borders.
Warp Gate 
Receive credits, revives
, new ships, upgrades or even new apexes
When you finish/skip the Prologue, you will receive one of the following 3 ships below:
After which,
- Your 1st Warp Gate activation comes after 72 hours of finishing the Prologue. This is generally trivia since progressing to finish Campaign Mission #3 will allow you to activate the Warp Gate immediately. It will guarantee a Rare
 ship.
ship. - Your 2nd Warp Gate activation comes 1 hour after your 1st Warp Gate activation.
- The 3rd Warp Gate comes 6 hours after the 2nd activation.
- Subsequently, Warp Gate activations come 12 hours after the previous activation. (Unless you have Phoenix 2 VIP
 , which reduces subsequent activations to 9 hours.)
Warp Gate activations cannot be stacked. This means the timer for the next Warp Gate activation only starts after the previous Warp Gate activation is triggered. The timer starts after you tap the Activate button, so you can admire the Warp Gate reward however long you like without it affecting the next activation time.
- Operator Mian only gives you a transmission for the first 5 Warp Gate activations.
- Subsequently, she only gives you a transmission if you get a new Super Rare
 ship or an Apex from the Warp Gate.
 - You also get a transmission if you get a ship that is currently in the shop (either when you get it from a Warp Gate activation, or you buy it with credits).
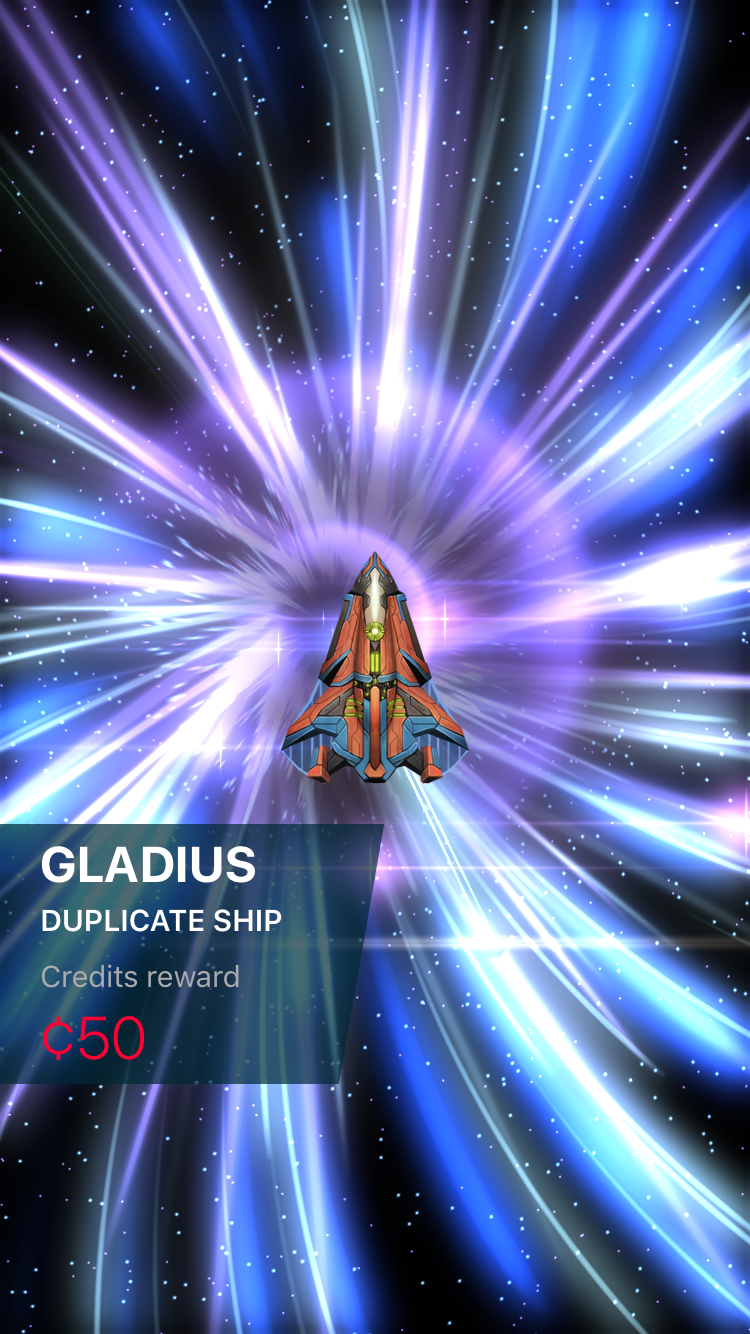
There are 4 types of rewards from Warp Gate activations:
- Supply Drop
- Rewards 2 revives + Either ¢50, ¢150, or ¢300
- Similar to Common
 , Rare and Super Rare ships, ¢50 Supply Drops appear more frequently than ¢150 Supply Drops and ¢150 Supply Drops appear more frequently than ¢300 Supply Drops.
- Rewards 2 revives
- 1 × Upgrade
 for an existing ship
- Upgrades one of the 3 stats (Main Weapon , Aura or Zen ) by one level.
- You can get an Ultimate
 Level upgrade too.
 - A fully upgraded (6-6-6) ship will not be included in the possible pool of ships.
- There are no distinctions between ship rarities. Any existing ships (even if it's a Super Rare ) has equal odds of being upgraded .
- An upgrade of higher credit value is less likely to occur than an upgrade of lower credit value.
- You can get an Ultimate
- If all your unlocked ships are fully upgraded (6-6-6), you will receive a special Supply Drop that gives you only ¢100 without revives instead.
- Upgrades one of the 3 stats (Main Weapon
- A new ship
- This unlocks the ship forever at 1-1-0.
- Only one ship, Phoenix, cannot be obtained from activating the Warp Gate.
- New Common ships appear more frequently than new Rare ships, and new Rare ships appear more frequently than Super Rare ships.
- An apex . This is EXTREMELY RARE. Some estimates place the odds of this to be 1/3000, but this probability is never verified.
- You can get an apex any time, even if you never unlocked the ship, have not fully upgraded (to 6-6-6) the ship, or if the ship is fully upgraded.
- No matter the current stats of the ship of the apex you got, the ship becomes fully upgraded (to 6-6-6) and the apex is unlocked forever.
- You cannot get Apexes that you already own through Warp Gate activations.
- You can get an apex
Rewards do not get better or worse the further you progress in the game (in terms of ranks or pilot level). It generally appears that the rewards get worse, but this is because you have more and more ships unlocked as you play more, so your chance of unlocking a new ship decreases.
Trivia 1: Supply Drops are a re-skin of getting duplicate ships previously, which rewarded you with one-tenth of the ship's buying cost without revives. This was how it was like to get duplicate ships before the v4.3 update:
Operator Mian gives you the following transmissions with regards to the Warp Gate:
| Condition | Operator Mian's Transmission |
|---|---|
| First Warp Gate Charged | Activate the Warp Gate to call in your new ship. I am excited to see what you'll get! |
Click into the Warp Gate page after First Time Charged Note: This transmission is repeated for every time you go back to the Warp Gate page after exiting out of it without activating it. | Free ships and supplies will be sent through the Warp Gate, activate it whenever you can. |
| You can also warp in certain ships and extra supplies on request. | |
| After activating the First Warp Gate | Lucky! That's a rare ship! Try it on your next mission to see how it is. |
| Now that you have more ships, you can choose which to fly in the ships selection. | |
| After viewing the first Rare | If you want, I can send you notifications when the Warp Gate is recharged. |
Subsequent 4 Warp Gates Charged Note: This is a repeated transmission every time you login if you do not activate these Warp Gates | The Warp Gate has recharged. Go activate it to get a new ship! |
Purchase new ship from Warp Gate screen, OR Receive a new ship from a Warp Gate activation that happens to be one of the ships in Get Ships | Great choice! A nice addition to your collection. |
| Lovely ship, one of my personal favorites. | |
| Wow, I've never seen that one before. | |
| That ship looks awesome! | |
| Look at those weapons, go get those invaders! | |
| I love that Aura and Zen Mode combination. | |
| Getting new Super Rare | Wow, that's a super rare ship! You don't get those often! |
| Getting new Apex | WHOOOOAAAAAA!!! An Apex straight out of the Warpgate! They are incredibly special. |
Trivia 2: There was supposedly another tier of rarity above Super Rare, which has an icon that looks like this. It was labeled "ULTRA Rare".

Trivia 3: According to the dev, Warp Gate drops are supplies from other forces whenever they can spare them.
Special Offer! / Free Items / Credits
You may occasionally get a Special Offer section which makes real life currency spent more worthwhile.
If you would like to spend real currency to get credits, always wait for the US$5 for ¢20.000 offer, as it is the most worthwhile package.
- This is the only special offer that is worth 4 times the normal value.
- Normally, US$5 only gets you ¢5.000.
- You can only buy this offer once per User ID.
- Once you buy any other credit packages with real currency, this offer will no longer be offered.
- Do NOT buy special offers that bundle both credits and revives . There is a price equivalent version of credits-only package which is more worthwhile.
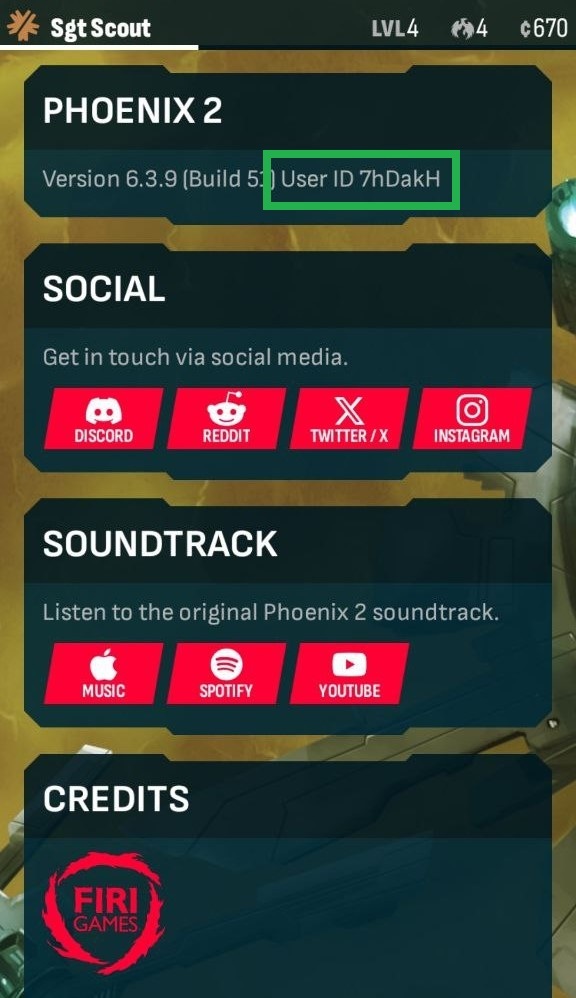
You can privately message the dev on Discord (@el) or Reddit (u/edrijver) to activate special offers on your account. Tap on the Firi Games ![]() icon at the top right corner of the main screen menus, and find your caSe-sEnsiTive User ID here to provide to the dev:
icon at the top right corner of the main screen menus, and find your caSe-sEnsiTive User ID here to provide to the dev:
- Note that the dev can only activate credit packs that are double the credits for the same price, which are the following special offers:
- US$5 for ¢10.000
- US$10 for ¢24.000
- US$20 for ¢50.000
- US$50 for ¢140.000
- These special offers last only 24 hours.
- You can still choose to use the special offer, or let it expire.
You can watch ad sessions in the Free Items section to get free credits and free revives
- Each ad session rewards you with either ¢125 or 2 revives (but not both).
- A new credit ad session is available every 24 hours. You can stockpile up to 3 credit ad sessions.
- A new revive ad session is available every 5 hours. You can stockpile up to 8 revive ad sessions.
- Ad sessions are weird. They rely on their respective ad service provider.
- If you are on the iOS or Mac OS platform, the ad service provider is Unity Ads.
- If you are on the Android platform, the ad service provider is Google Ads.
- The PC version doesn't allow you to watch ads.
- If you get an error when trying to watch an ad session, it is not the game's fault of not wanting to serve you ads. It is the ad provider not responding well to your request for ads. Check here to try to diagnose the issue if this happens.
- If the ad session doesn't work properly to skip to a next ad or redirect back to the game after it is finished, there might be something wrong with either your device or the ad provider. You can try hitting the Back button if you are using an Android device to exit the ad session to get your reward.
- The timer for the next ad session continues to run if the maximum number of stockpiled ad sessions is not reached, so there is no need to worry about watching ad sessions as soon as they appear.
- If you do not hit the maximum stockpiled amount of either credit or revive ad sessions, it will feel like it takes less than 24 and/or 5 hours before the next credit and/or revive ad session is available after exhausting all currently available ad session.
- This is because the timer for the next ad session is already counting down before you watched the ad sessions.
- Initially, you can only stockpile up to 2 credit ad sessions and 3 revive ad sessions.
- As you watch more credit and revive ad sessions, the maximum amount of stockpiled credit and revive ad sessions respectively will increase.
- There is a maximum number of credit and revive ad sessions you can watch on a monthly basis, according to the dev.
- However, the limit is not clear.
- If you hit the limit, the icon to watch the respective ad session would simply not appear.
- This may be why you may not get a revive or credit ad session even after 5 hours or 24 hours have elapsed respectively.
You can always buy credits with real-life currency at any time without special offers.
Although much better if you wait for the special offers above, these credit packages are always available:
- US$1 for ¢800
- US$5 for ¢5.000
- US$10 for ¢12.000
- US$20 for ¢25.000
- US$50 for ¢65.000
- US$100 for ¢140.000
When you buy any credit (even if bundled with revives) package from the shop, you get a special supply drop from the Warp Gate:

Get Ships 
Use credits to buy and unlock the ship you desire without waiting for the Warp Gate
Just like getting a new ship from Warp Gate activations, a new ship bought from here will be at 1-1-0.
The shop refreshes every 6 hours at the following times with respect to UTC / GMT+0:
- 12am / 0000
- 6am / 0600
- 12pm / 1200
- 6pm / 1800
The selection of 3 ships depend on your rank. Refer to Appendix A: Shop Cycle for full details.
Tapping on a ship in Get Ships gives you a pop-up to buy the ship.
- Common ships always cost ¢500.
- Rare ships always cost ¢1.500.
- Super Rare ships always cost ¢3.000.
- The Preview button allows you to try the ship at main weapon level 3 without Aura and Zen unlocked.
- If you already bought the ship, you can still tap the Preview button which still showcases the ship at main weapon level 3, no matter your current main weapon level of that ship.
- If you already bought the ship, you can still tap the Preview button which still showcases the ship at main weapon
Occasionally, when a new update is introduced with new ships, a 4th ship slot becomes available that cycles through the newly released ships. After some time (usually about a week), the 4th slot is no longer be available, and the entire shop cycle changes to integrate the newly released ships.
Phoenix Revives
Revives are like Extra Life tokens when you die, allowing you to resume play at the start of the Act you died on.
- You need to be at least Pilot Level 20 to have access to revives.
- You can NEVER use revives in the Campaign, even after unlocked.
- To activate revives,
- Tap on the revives icon to the left of the Play button.
- Tap on the number of revives you want to bring to the mission, from 0 - 5.
- Tap outside the Phoenix Revives pop-up and click Play.
- Tap on the revives icon
- If the number of revives chosen is between 1 - 5, when you die on any wave from Act 2 onwards, you are automatically thrown back to the start of the Act you died on.
- Dying at Wave 1-1, 1-2, 1-3 or 1-4 simply ends the game.
- You will revive with the amount of Aura energy JUST as you kill the last Invader in wave 4 of the previous Act.
- Energy from uncollected particles before the Act transition are not accounted for when reviving.
- Thus, collect enough particles to completely fill your Aura before killing the last Invader if you know you need revives for the next Act.
- When you revive, the playing area is cleared of all bullets and particles.
- All barriers
 and the active Phalanx
  deployed (if any) also disappears.
 - You have to accept your particle and barrier/Phalanx penalty in exchange for a clear playing area.
- All barriers
- There is a time
 penalty added to your final time for every revive.
- The time taken on the Act you died on is added to your time (the timer "continues to run").
- The amount of time between the moment you enter the wave you died on and the instance of death is counted to your time, along with the time spent on any previous wave(s) of the Act.
- For example, if you died at 5-3, the time taken on 5-1 and 5-2 in that instance is also added to your final time, along with the time spent in that instance of 5-3 before you died.
- On top of this, 5 seconds is added for each revive.
- When you use up all the revives you brought to the mission (between 1 - 5 as chosen only before starting a game, not the total number of revives you have), "Last Revive" appears as you use up your final revive for the run.
- If you die again without completing the mission, the game ends.
- The number of revives you brought is for the entire mission, so it does not reset when you reach the next Act.
- If you have Phoenix 2 VIP active and opt to use the 1CC subtitle, the subtitle will NOT appear on your leaderboard entry if you use revive(s) to clear the mission.
It is highly recommended NOT to use revives, unless:
- You are in a rush to clear the mission, for whatever reasons in real-life or it is very close to mission reset time;
- You insist on not demoting from a certain rank, so you have to at least clear one daily mission;
- Possibly, you want to buy a ship that is upcoming in the shop (definitely check Appendix A first for this).
- Or, for some reason, you want to play a certain specialist mission the next day (definitely check Appendix B1 for Colonel
 , B2 for Major
  , B3 for Commander
  , or B4 for Marshal for this).
- You are trying to clear an excruciatingly difficult Marshal specialist mission to earn a prestigious Against All Odds
 badge;
- Remember to check that the mission clear rate is WELL below 3%. Because if it is above 2.9%, there is a good chance the clear rate will cross 3% at mission reset, which will mean all the players who cleared that mission will no longer get a prestigious Against All Odds badge for clearing the mission.
- And definitely, don't use the Wave Completion % as a gauge. You must count the number of clears currently and then calculate the clear rate based on the total number of current players.
- If clearing that difficult mission is not going to get you a prestigious Against All Odds badge, there is no point trying to brute force your way to clear it. Save your sanity for the missions that matter.
- There have NEVER been any Marshal S4
 normal daily missions with a clear rate of less than 3%, so it is not recommended to use revives just to clear such missions.
- Remember to check that the mission clear rate is WELL below 3%. Because if it is above 2.9%, there is a good chance the clear rate will cross 3% at mission reset, which will mean all the players who cleared that mission will no longer get a prestigious Against All Odds
- You are trying to earn a prestigious Ogon Is Fine
 badge by completing a Marshal S4 mission with Ogon.
- Do check if it is viable to attempt this feat by checking the clears in the leaderboard. There will always be extremely skilled players who can clear missions which are excruciatingly difficult for Ogon. If there are more than 5 clears with Ogon for that Marshal S4 mission, it's a good indication that it is viable.
- Remember, you should not clear with another ship before and after successfully completing this feat, as the Ogon Is Fine badge requires you to leave your leaderboard position with Ogon up on the Marshal S4 mission leaderboard.
- Do check if it is viable to attempt this feat by checking the clears in the leaderboard. There will always be extremely skilled players who can clear missions which are excruciatingly difficult for Ogon. If there are more than 5 clears with Ogon for that Marshal
Remember, there is no shame in not being able to clear your missions. It's a game, there are no real-life consequences if you don't clear your missions.
- There is ALWAYS another chance to get what you want, as this game is quite generous. For example, you can always promote back up even if you demote.
- The scenarios detailed above are those that are much harder to come by. But as already mentioned, there is ALWAYS another chance since this game follows certain cycles, so it's not the end even if you don't clear that mission.
You can buy Phoenix Revives at the following prices. However, it is strongly advised against buying Phoenix Revives since they do not make you a better player, and they are not worth the credits.
- 5 revives at ¢600
- 25 revives at ¢2.500
- 125 revives at ¢10.000
Buying Phoenix Revives gives you a special Supply Drop as shown below:
Firi Account 
Creating a Firi Account allows you to preserve your progress.
- Even if you delete and reinstall Phoenix 2, or if your device with Phoenix 2 is no longer accessible, you can recover your progress on the same or different device.
- It is possible to play the same Firi account on 2 separate devices as all progress will be updated across all devices.
- Playing on the same Firi account on 2 devices at the same time will cause one of the devices to be kicked out after trying to update progress by for example, playing a mission or spending/earning some credits.
- To create a Firi Account:
- To create a Firi Account, tap on Pilot
 at the main screen.
 - Under Firi Account, tap on Sign In.
- Tap on Register and fill in the email address and password as desired.
- While the email doesn't need to be a valid email (So long it fulfills the format _@_._), it is highly recommended you create a Firi Account with a valid email which makes the sign in process significantly easier.
- To create a Firi Account, tap on Pilot
To log out of your Firi account, you can do the same way as previously.
- Tap on Pilot
- Tap on Sign Out
To log back in:
- Tap on Pilot
- Click Sign in
- Click Sign In again
- Type in the email used for your Firi account.
- Once your Firi account email is correctly entered in, the game sends an email, so check your email on the same device.
- It might go to your spam folder so do check there as well if you do not see it in your inbox.
- Click on the sign-in link in your email, and it should automatically open up Phoenix 2 app again to successfully log you into your Firi Account.
If you keep entering the same email address to the Sign In process, but fail to successfully sign in for 2 times, an error pop-up will appear on the 3rd time and onwards. This means you must now enter both the correct Firi Account email & password, so make sure you have the password recorded down somewhere. (A password manager would be a good idea since you rarely need to key in this password.) If you want to trigger another password-less / email login again after 2 attempts, you have to wait 24 hours.
- If you want to change your password for a Firi Account, you can do so through the form in this link:
https://proxy-users.firigames.com/change-password - Contact the dev directly through Discord (@el) or Reddit (u/edrijver) or email support@firigames.com for the following matters:
- You forgot your password.
- You want to change your email address for a Firi Account you registered.
- You lost your account, whether is it a Firi Account or a local account that used to exist on your device before you deleted the Phoenix 2 app. Provide as many details as possible, such as the following below.
If it is a lost local account, prepare an email and a separate password (doesn't need to be your email password) that can be used as the lost local account will be associated with an email for the recovery process.- Your email (if you registered a Firi Account)
- Your Pilot Name
- The community you joined for community mission
- Your 6 alphanumeric User ID (caSe-sEnsiTive) which you can find out here
- Any other details that might help, such as what ships you had, your rank, etc etc
If you already have a Firi Account in Phoenix HD, the predecessor game of Phoenix 2, you can skip the account creation process and simply log in using your Phoenix HD account.