General
Phoenix II —FAQ (IOS)

BOOKMARK
FAQ (IOS) by light_rock_zz
Version: 5.3 | Updated: 10/10/2025
FAQ of the Month Winner: January 2020 | Highest Rated Guide
General
| General Tips & Game Interface | ||
|---|---|---|
| Beginner's Guide | Pilot | Phoenix 2 VIP |
| In-game Tips | Survival Tips | Speedrunning Tips |
Beginner's Guide
Your first ship and your first few Warp Gate ![]() activations may not always give you the best ships. Do not upgrade whatever you are given on impulse.
activations may not always give you the best ships. Do not upgrade whatever you are given on impulse.
Depending on your comfort, there are 2 ways you can proceed with your ship upgrades ![]() .
.
- Pick a beginner friendly ship to upgrade
 and master the basics of the game such as dodging and using your Aura
  and Zen
  .
.- Getting a beginner friendly ship may only get you to the golden ranks


 , before you might get stuck trying to advance further up the ranks.
 - If you choose to go with this approach, the Beginner Friendliness List will help you out.
- Getting a beginner friendly ship may only get you to the golden ranks
- Alternatively, get a ship with a high survivability rating for the long run. This would allow you to get to the highest Marshal
 rank, or at least, the second highest Commander rank quite easily.
- This approach is more likely for you as a beginner to have a slightly tougher time when ranking up.
- You may get stuck at some ranks or even demote ranks on some days.
- This is because mastering some of the higher survivability ships may take a bit more practice.
- If you prefer this approach, get a ship with a survivability tier of at least S- in daily missions in this Basic Tier List.
- If you don't feel like waiting any further, a survivability tier of A or A+ in daily missions will also get you far, although the learning curve will be slightly steeper.
- This approach is more likely for you as a beginner to have a slightly tougher time when ranking up.
It is better to get a ship with a Shield Breaker ![]() weapon first (that deals with Shielded
weapon first (that deals with Shielded ![]() missions), then a ship with an Armor Piercing
missions), then a ship with an Armor Piercing ![]() weapon (to deal with Armored
weapon (to deal with Armored ![]() missions), and lastly, a ship with a High Impact
missions), and lastly, a ship with a High Impact ![]() weapon that deals with Unprotected
weapon that deals with Unprotected ![]() missions.
missions.
- This is because there are more Shielded
 missions than Armored
  missions.
 - The number of Unprotected
 missions are the least.
If you are unable to find such a good beginner friendly or high survivability ship, play the game without upgrades, putting utmost focus into survival (looking at your core at all times). You should be able to get to at least Ace rank ![]() if you dodge well enough.
if you dodge well enough.
On the first day or first few days you play the game, play until you unlock Campaign Mission #8 first. This allows you to clear all the daily missions ![]() for a huge number of credits. Finally, try to clear as many campaign missions
for a huge number of credits. Finally, try to clear as many campaign missions ![]() as you possibly can.
as you possibly can.
- The difficulty of campaign missions
 slowly go up until about Major rank. Thus, if you can clear a huge number of campaign missions in your early days of the game, you will get very far.
 - The purpose is to level up
 quickly and thus gain more credits.
 - Also, join a community mission
 so that you are able to gain additional credits from community missions.
- Refer to the List of Communities for a community you can join.
- It is recommended to try and rank up until you reach Captain
 rank.
rank.
Be sure to search up for videos of the ship you are intending to upgrade ![]() , before actually upgrading it, to make sure it fits your playstyle.
, before actually upgrading it, to make sure it fits your playstyle.
- Refer to the All Ships (Alphabetical Ordering) in order to find the ship you want to upgrade , and a YouTube video of the ship's gameplay can be watched when you click on the ship.
Here are some tips on ship upgrading. Preferably, do these steps in order:
- Focus all your upgrades into that one ship you picked.
- Do not spend your credits on more than one ship at a time.
- Even if you get another better ship, continue to upgrade that ship you were focused on.
- If you have only invested 1-4 upgrades into your current ship, it is justifiable to abandon it for the better ship.
- After you have upgraded your first chosen ship to 5-6-6, you should have already gotten a lot of other ships. Hopefully, many of them should have a high survivability rating reflected in the Basic Tier List.
- Focus on diversifying your ship collection instead of buying apexes.
- This means getting a Shield Breaker
 ship if your first ship upgraded is an Armor Piercing
  ship, or vice versa.
 - If your ship is a High Impact
 ship, focus on fully upgrading (to 5-6-6) a Shield Breaker ship next, then finally an Armor Piercing ship.
- This means getting a Shield Breaker
- Focus on staying in Captain rank suiciding at 5-4 on a 3rd mission, and fully clearing the other 2 missions if necessary).
- Focus on diversifying your ship collection instead of buying apexes.
- Once you have the 2 (or 3) ships upgraded, you can look to buying and fully upgrading (to 5-6-6) ships with an X Tier for survivability when they appear in the shop.
- Remember to save up at least ¢3.000 so that you can buy the ship once it hits the shop.
- Once you have access to at least one ship for each group specialist mission in the gold ranks , continue to improve your rank to Commander .
- Refer to Appendices B1, B2 & B3 for the ships you can have. Alternatively, refer to Appendix C for a customized solution to buy the least number of ships.
- Finally, once you have upgraded at least one ship to comfortably tackle all group specialist missions, you can challenge the highest Marshal rank.
- Refer to Appendix B4 for the recommended ships to upgrade, or refer to Appendix C for a customized solution to spend the least amount of credits.
- But be prepared, fellow pilot, as Marshal rank is a whole new level of difficulty out there. The difficulty increase is significantly higher than the increase from Captain to Colonel (which is already quite a jump).
Finally, if you are on social media platforms for Phoenix 2, don't be afraid to ask for help as many are happy to help! Refer to External Links / Resources for some of these social media platforms.
Pilot 
The tables below show all the badges. When it comes to badges that show up on your profile when players click on your leaderboard entry, there are a few rules that follow:
- Badges under the category of Special Badges always appear, so long you have at least one of it.
- From the badges you have obtained, only the top 2 badges from the categories of Missions Completed and Leaderboard appear.
- This excludes the Marshal SSSS Mission Complete badge
 , which will always appear if you have at least one.
 - This excludes the Mission Played badge
 which will always appear as the last badge.
 - This excludes the Number One badge
 which will NEVER appear.
 - This excludes the Platinum / Gold / Silver / Bronze VIP Mission Completed badge, where only the highest one would appear no matter how many or few of it you have.
- This excludes the Marshal SSSS Mission Complete badge
- For the Campaign category, the Par Time Beaten
 and Firi Games Time Beaten
  badges take priority over the Campaign Mission Complete badge
  .
. - League V2 badges and Classic badges do NOT appear.
Special Badges
| Badge Icon |  |  |  |  |
|---|---|---|---|---|
| Badge Name | Best of the Best | Best of the Best | Against All Odds | Ogon is Fine |
| In-game description | Became #1 in the leaderboard of the hardest league! | Became #1 in the leaderboard of the hardest league of a Specialist Mission! | Was among the few pilots who completed a very difficult mission. | Complete an SSSS league mission with Ogon on the leaderboard. |
| Additional description | Earned when you are first (#1) in the daily Marshal S4 mission leaderboard when the daily mission is reset. Collected only during mission debriefing. | Earned when you are first (#1) in the Marshal S3/S4 daily specialist mission leaderboard when the specialist mission is reset. Collected only during mission debriefing. | Earned when you have cleared a mission with less than 3% clear rate (= Number of leaderboard entries that cleared mission ÷ Total number of leaderboard entries for mission) on any Marshal
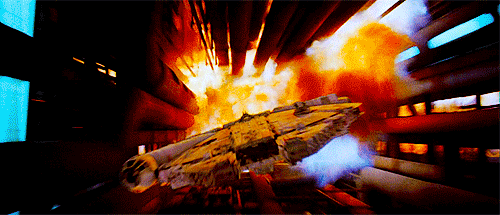
Trivia: The badge shows a front view of the titular ship Phoenix in 3D. According to the dev, a ship flying out of an ongoing explosion speaks "Against All Odds" to him. It is pretty accurate since the red bubbles represent explosions and the white streaks represent emerging from the explosions. This image happens to be the Millennium Falcon escaping after destroying the Death Star. | Earned when you cleared with Ogon in a Marshal
|
| Badge Icon |  | 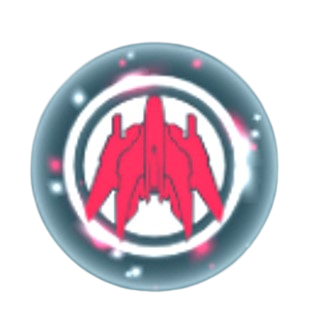 |  |  |
|---|---|---|---|---|
| Badge Name | Pin Challenge | Pin of Excellence | VIP | Best of the Best |
| In-game description | Completed the Phoenix 2 Pin Challenge! | Achieved special recognition for community efforts. | Obtained VIP membership. | Became #1 in the leaderboard of a Platinum VIP mission! |
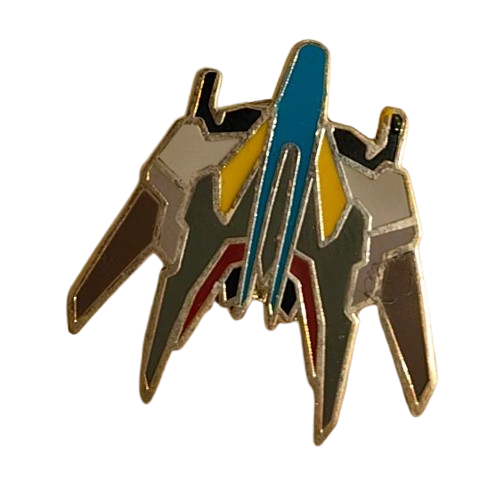
| Additional description | An exclusive badge awarded to players (manually by the devs) who played the retail demo version of Phoenix 2, took a photo of the cleared demo mission, and emailed it to the devs. It is no longer possible to obtain this badge as the retail demo of Phoenix 2 no longer exists. Don't try asking the devs for this badge, you WILL NOT get it. Players also obtained a physical Phoenix 2 pin upon completing this challenge (together with a few other small goodies, which differed depending on season), sent to the player's physical home address. The pin is as shown below:
Here's the link to the details of the now discontinued Pin Challenge: NB: You can't have both the Pin Challenge and the Pin of Excellence badge together. Only the dev's pilot profile has both. | An exclusive badge awarded to players (manually by the devs) who made a significant contribution recognized by the devs. Only a small handful of these are given out per year. NB: You can't have both the Pin Challenge and the Pin of Excellence badge together. Only the dev's pilot profile has both. | Collected on every purchase of the Phoenix 2 VIP. The current number of VIP badges is therefore your VIP level. | Earned when you are first (#1) in the Platinum VIP mission Collected only during mission debriefing. |
Missions Completed
| Badge Icon | |  |  |
|---|---|---|---|
| Badge Name | Marshal SSSS Mission Complete! | Platinum VIP Mission Completed! | Marshal Mission Complete! |
| In-game description | Marshal SSSS Mission Complete! | Completed a Platinum VIP mission. | Completed a Marshal rank mission! |
| Additional Notes | Collected immediately after mission completion. | ||
| Badge Icon |  |  |  |  |
|---|---|---|---|---|
| Badge Name | Gold VIP Mission Completed! | Commander Mission Complete! | Major Mission Complete! | Colonel Mission Complete! |
| In-game description | Completed a Gold VIP mission. | Completed a Commander rank mission! | Completed a Major rank mission! | Completed a Colonel rank mission! |
| Additional Notes | Collected immediately after mission completion. | |||
| Badge Icon |  |  |  |  |
|---|---|---|---|---|
| Badge Name | Silver VIP Mission Completed! | Captain Mission Complete! | Lieutenant Mission Complete! | Ace Mission Complete! |
| In-game description | Completed a Silver VIP mission. | Completed a Captain rank mission! | Completed a Lieutenant rank mission! | Completed an Ace rank mission! |
| Additional Notes | Collected immediately after mission completion. | |||
| Badge Icon |  |  |  |  |
|---|---|---|---|---|
| Badge Name | Bronze VIP Mission Completed! | Sergeant Mission Complete! | Ensign Mission Complete! | Cadet Mission Complete! |
| In-game description | Completed a Bronze VIP mission. | Completed a Sergeant rank mission! | Completed an Ensign rank mission! | Completed a Cadet rank mission! |
| Additional Notes | Collected immediately after mission completion. | |||
Campaign
| Badge Icon | | | |
|---|---|---|---|
| Badge Name | Campaign Mission Complete! | Par Time Beaten! | Firi Games Time Beaten! |
| In-game description | Completed a Campaign mission | Beaten the par time of a Campaign mission. | Beaten the developers' fastest time of a Campaign mission. |
| Additional Notes | Collected immediately after campaign mission completion. | ||
Leaderboard
| Badge Icon |  |  |  |  |
|---|---|---|---|---|
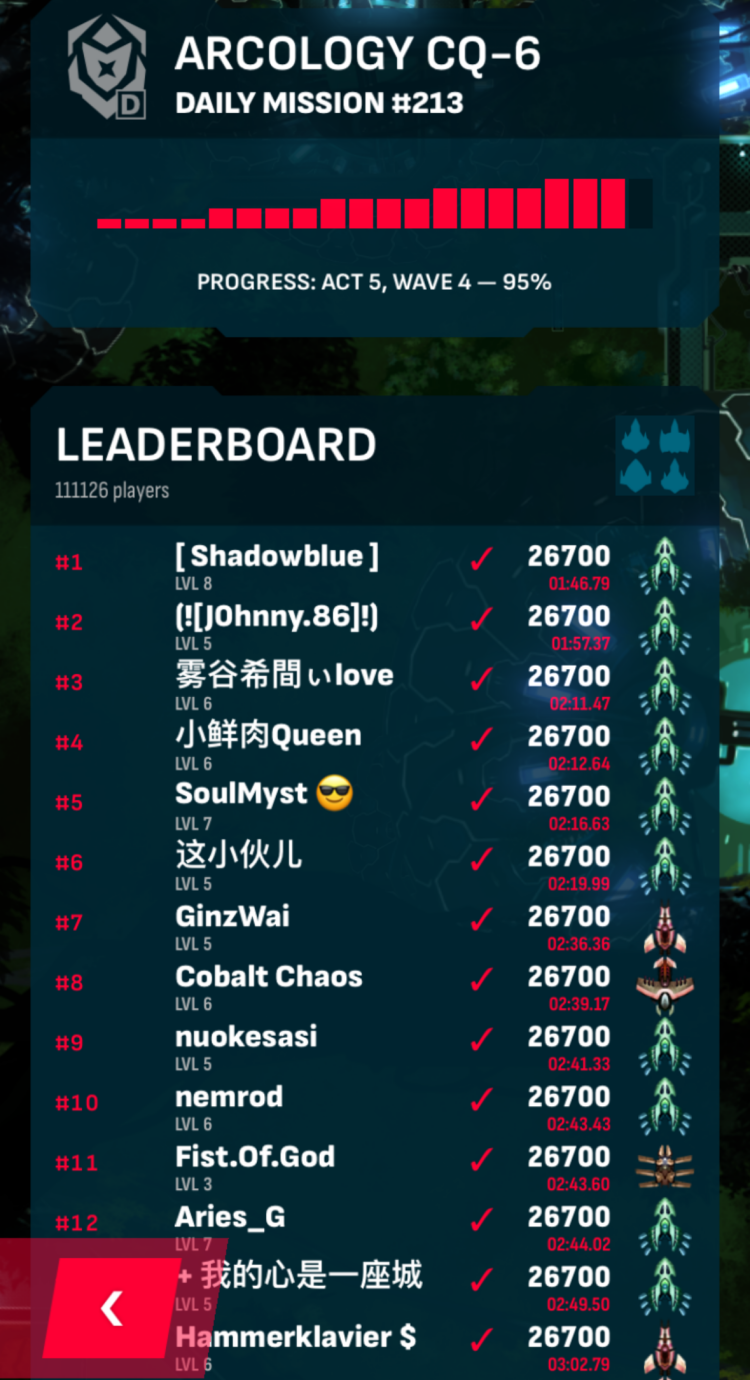
| Badge Name | Top 0.001% | Top 0.01% | Top 0.1% | Top 1% |
| In-game description | Reached the top 0.001% in a leaderboard with at least 100k players. | Reached the top 0.01% in a leaderboard with at least 10k players. | Reached the top 0.1% in a leaderboard with at least 1000 players. | Reached the top 1% in a leaderboard with at least 100 players. |
| Additional Details | Back in v1.0 - v1.1.3, all Phoenix 2 players were placed in one leaderboard. At some point in time, there were more than 100,000 players. Specifically, Daily Mission #213 had 111,126 players. A player called [ Shadowblue ] topped the leaderboards, thus obtaining this prestigious Top 0.001% badge.
| Back in v1.0 - v1.1.3, all Phoenix 2 players were placed in one leaderboard, so it was possible to obtain this badge. It is no longer possible after leagues were introduced in v2.0. | Collected only during mission debriefing. | |
| Badge Icon |  | | | 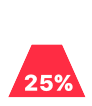 |
|---|---|---|---|---|
| Badge Name | Top 10% | Number One | Mission Played | Top 25% |
| In-game description | Reached the top 10% in a leaderboard with at least 10 players. | Reached the number one position in a leaderboard. | Awarded for each mission played. | Reached the top 25% in a leaderboard. |
| Additional Notes | Collected only during mission debriefing. | |||
League V2 Badges
| Completion Badge Icon |  |  |  |  |
|---|---|---|---|---|
| Completion Badge Name | SSSS League Mission Completed! | SSS League Mission Completed! | SS League Mission Completed! | S League Mission Completed! |
| In-game description | Completed an SSSS league mission! | Completed an SSS league mission! | Completed an SS league mission! | Completed an S league mission! |
| Participation Badge Icon |  |  |  |  |
| Participation Badge Name | SSSS League | SSS League | SS League | S League |
| In-game description | Participated in an SSSS league mission. | Participated in an SSS league mission. | Participated in an SS league mission. | Participated in an S league mission. |
| Additional Details | As long as you attempted the mission, meaning you killed at least 1 Invader in a mission, you were considered to have participated in that league's mission. These badges were only obtainable in v2.1 - v4.5.3, since S+ leagues were only introduced in v2.1. | |||
| Completion Badge Icon |  |  |  |  |
|---|---|---|---|---|
| Completion Badge Name | A League Mission Completed! | B League Mission Completed! | C League Mission Completed! | D League Mission Completed! |
| In-game description | Completed an A league mission! | Completed a B league mission! | Completed a C league mission! | Completed a D league mission! |
| Participation Badge Icon |  |  |  |  |
| Participation Badge Name | A League | B League | C League | D League |
| In-game description | Participated in an A league mission. | Participated in a B league mission. | Participated in a C league mission. | Participated in a D league mission. |
| Additional Details | As long as you attempted the mission, meaning you killed at least 1 Invader in a mission, you were considered to have participated in that league's mission. These badges were only obtainable in v2.0 - v4.5.3. | |||
Classic Badges
| Badge Icon |  |  |  |
|---|---|---|---|
| Badge Name | Mission Complete! | Act 4 Reached | Act 5 Reached |
| In-game description | Completed a daily or community mission! | Reached Act 4 of a daily or community mission. | Reached Act 5 of a daily or community mission. |
| Additional Details | Currently, you can only earn this badge when you complete a community mission Back in v1.0 - v1.1.3, this badge was a lot more valuable since you had to complete the daily mission, a tough feat in the early days when ships were a lot weaker back then (especially without Ultimate | You can only earn these badges in v1.0 - v1.1.3 as there were no leagues or ranks back then. Everyone was thrown into one single leaderboard. You would only get one of the 2 badges per mission. So if you reached Act 5 in an old mission, you only get the Act 5 Reached badge, and not the Act 4 Reached badge. | |
Phoenix 2 VIP
A pass which only lasts for exactly 30 days from the time of purchase. After 30 days / 720 hours, the perks given by the pass expire.
- It costs US$5 to purchase.
- Note that unlike most game passes, the Phoenix 2 VIP is not a subscription model. You will NOT be automatically charged after the 30 days / 720 hours has elapsed. Instead, it would simply expire and all VIP perks would wear off.
- All your player tags in the leaderboards of old missions during the period when VIP was active would stay permanent.
- You will need to manually renew the Phoenix 2 VIP near the end of the 30 days. You can start renewing VIP 24 hours before VIP expires.
Perks of the Phoenix 2 VIP:
- Warp Gate
 recharge reduces from 12 hours to 9 hours.
- On activation of the VIP, the Warp Gate becomes instantly recharged.
- Daily free ¢125 that can be collected from the Warp Gate . The next free ¢125 can be collected at exactly 12am GMT+0 / UTC+0.
- The amount of XP earned is doubled.
- You get a new VIP badge for every activation of the Phoenix 2 VIP, which is viewable by all players who check out your leaderboard entry.
- You get a one-time reward of ¢1.000 for every activation of the Phoenix 2 VIP.
- You get access to the exclusive daily VIP Mission.
- Customizable Player Tags. These show up in all leaderboards you have participated in only while the VIP is active, and are very easy to spot.
- Leaderboard entries made prior to buying this Phoenix 2 VIP or entries made after the expiry of the Phoenix 2 VIP are not affected.
- It does not affect the player details card when a player taps on your leaderboard entry.
- As your VIP level increases, you get access to more Player Tag options.
- There are exclusive time-limited Player Tag options that appear from time-to-time, which are available to anyone who has VIP active.
- If you opt to use these time-limited Player Tag options, you can still keep them after the limited time period is over.
- However, attempting to re-customize your Player Tag will result in an error unless you stop using these time-limited player tag options.
Since the VIP costs US$5 to purchase, we can compare it to the equivalent special offer pack of US$5 that offers you ¢10.000.
- Clearing the VIP mission gives you ¢200 daily.
- You can collect a free ¢125 everyday from the Warp Gate .
- You also get a one-time reward of ¢1.000 upon activating VIP.
- If we add all these up, this becomes 31 × (125 + 200) + 1000 = ¢11.075.
- Although VIP only lasts for 30 days, you can activate VIP halfway through a daily mission (e.g. 12 hours before mission reset). This allows you to cover 31 daily missions, thus having access to 31 VIP missions and being able to claim the free ¢125 for 31 days.
- Of course, this calculation assumes you can clear the VIP mission everyday.
- We can conclude that the VIP package is more worthwhile than the US$5 special offer.
- However, compared to higher value special offers (US$10 and above), the credits per real world currency spent is less if you spend it on the Phoenix 2 VIP.
- This excludes potential credits increase due to more frequent Warp Gate openings.
- Rewards from Warp Gate openings are unpredictable and may give you upgrades, which are worth more than Supply Drops.
- In addition, you may not open a lot more Warp Gates when VIP is active due to the odd reduction in Warp Gate recharge time.
- While the reward increase from the decrease in Warp Gate recharge time is not significant, the VIP package is worth a bit more than ¢11.075.
Here is a table showcasing the options available for the different VIP levels.
- Every time you renew VIP, you go to the next level of VIP, which unlocks additional color schemes, background and/or dividers.
- Thus, with VIP active, the number of VIP badges you have = your VIP level.
- On the next activation of VIP (regardless of whether your VIP is currently active or expired), your new VIP level = number of VIP badges + 1.
- It's perfectly fine to have VIP expire for a while and only buy VIP again after some time. Your VIP level on the next activation will be the same as the number of VIP badges you will have after purchasing the VIP.
- You can check out the current VIP level of the player (if the player has VIP active), or the VIP level the player was before their VIP expired by checking the number of VIP badges .
- The number of styles, ship icons and subtitles stay the same for all VIP levels.
- The only special subtitle is the 1CC subtitle, which only appears if the VIP player's entry on the leaderboard is a clear made without revives.
- If not, no subtitle would appear on the player tag even though the style supports it.
| VIP Level | New Color Schemes Available (BG = Background, rgb = Red Green Blue) | New Backgrounds Available | New Dividers Available |
|---|---|---|---|
| 1 |
|
| |
| 2 |
| ||
| 3 |
|
| - |
| 4 |
|
| |
| 5 |
| ||
| 6 |
| - | |
| 7 |
| - | |
| 8 | - | ||
| 9 | - | ||
| 10 | - | - | |
| 11+ | - | - |


In-game Tips
After each game, at the leaderboards screen, the game gives you a random tip. I have roughly categorized the tips in categories. The above categories are generally more important than the tips in below categories.
Gameplay
- The glowing circle around your ship shows the range of your Aura. Unleash it by tapping with a second finger.
- A good opportunity to charge up powerful abilities is between waves.
- Clear one side of Invaders first, and use that space to retreat.
- Moving slow and deliberate is often better.
- Elite pilots upgrade their ships and use the two abilities, Aura and Zen, very often.
- Fly close to enemy bullets to earn bonus energy, this is called grazing.
- Only the blue blinking core on your ship can be hit.
- Homing weapons hit more easily, but deal less damage.
- Invaders glowing yellow are armored. Hit their cockpit or choose a ship with an Armor Piercing main weapon.
- Invaders glowing blue are protected by shields. Choose a ship with a Shield Breaker main weapon.
- Charge Mega Laser and Mega Bomb at the center of the screen to have a better chance of hitting Invaders.
- Sometimes offense is the best defense. Aggressively destroy Invaders first, before they unleash bullet hell.
- Fly an offensive ship aggressively and target dangerous Invaders first.
- Use defensive abilities to remove bullets, like Bullet EMP, Point Defense and Reflex EMP.
- Keep an eye on empty locations to retreat. Some ships can teleport.
- Tap with a second finger to unleash your Aura Ability.
- Shield yourself from enemy bullets and lasers using Barrier, Personal Shield or Phalanx.
- The timer on top of the screen when you beat a wave shows how fast you are compared to your previous attempts.
- Survive first, worry about Invaders later. Some ships target Invaders automatically.
- Success depends on tactical use of your ship's special abilities.
- You can destroy individual turrets on enemies. Take out the most dangerous first.
- Trigger MIRVs early by moving close to them, then retreat. Spread out bullets are easier to avoid.
- Use your ship's special abilities often. They charge up quickly again.
- You can wait until most bullets are gone before you destroy the last invader.
- Don't collect energy when your Aura is already large. It would be wasted.
General
- Apex forms are more than a paint job. They enhance abilities and open up even more strategies.
- Apex forms also enhance the abilities of a ship, and add new strategic value.
- Ships have very different abilities. Try them out and see how far you get.
- Get new ships from the Warp Gate. Different ships offer new strategies to defeat the Invaders.
- Your favourite ship can become even more powerful once you upgrade it completely.
- Completely upgrade a ship to see its Apex forms.
- Find your style and try other ships.
- Choose a ship with a main weapon that is best for the mission. Invaders can have shields, armor or are unprotected.
- How far you get and how fast you get there determine your position on the Leaderboard.
- Tap on the mission icons in the Play tab to see leaderboards, your score and mission Intel.
- Get new Ships from the Warp Gate. The offer changes every few hours.
- Completing S4 with Ogon on the leaderboard should be rewarded.
- You can earn more credits by playing Community and Specialist Missions.
- Inspect a ship and see what abilities you can upgrade and unlock.
- Some ships have powerful extra weapons, can teleport or create shields. Try them out.
- If you struggle with a mission, try it with a different ship.
- The unique combination of weapon, Aura and Zen on each ship can unlock unexpected strategies. Experiment!
- Make sure to unlock the Zen Ability of your ship.
- Unlock everything on a ship to see its advanced Apex forms.
- Tap on a ship in the Ships tab or Play tab to view upgrade options.
- Don't forget to upgrade your ships.
- You can always review mission intel by tapping on the mission icons in the Play tab.
- Unlock the Zen ability and lift a finger to charge it.
- A higher ship rarity does not mean it is more powerful.
Miscellaneous
- Watch ads in the Warp Gate tab. They replenish after a while.
- It is possible to get an Apex from the Warp Gate.
- Create a Firi account in the Pilot tab to backup your progress.
- The best pilots can complete a mission with any ship.
- Everyone around the world plays the exact same Daily Missions. There are new ones every day.
- Don't miss out on new ships, free upgrades and supplies by visiting the Warp Gate tab.
- There will be a new mission waiting for you tomorrow.
- Visit the Pilot tab to review stats, previous mission results and your scores.
- Even when you don't complete a mission, you earn rewards for beating waves you haven't beaten before.
- Use your Firi account to play on multiple devices with the same pilot.
- If today's mission is too challenging, try again tomorrow. There will be a new one.
- There is a new and unique mission every day.
- Inspect a ship by tapping on it on the Play Screen.
- Watch ads in the Warp Gate tab for extra credits and revives.
- Rare ships are less likely to show up in the Warp Gate.
Fun
- Discuss Phoenix 2 ships and strategies with other players via the Community tab.
- Send questions and love letters to phoenix2@firigames.com.
- Fight off Invaders every day.
- Impress other players on the leaderboard with your unique ship choice.
- Create your own Community to play with your friends.
- Praise the Warp Gate
- Toggle music off and back on to cycle between tracks.
- Score a top position with an unusual ship to earn respect from other pilots.
General Survival Tips 
The more beginner survival tips are at the top while more advanced survival tips are below.
- As a complete beginner, concentrate on your ship core as it's the only thing that matters. Invaders are generally secondary.
- Once you get better, you can start focusing some attention on the Invaders by aiming your main weapon
 , Aura or Zen .
- Once you get better, you can start focusing some attention on the Invaders by aiming your main weapon
- Auras and Zens are meant to be used. USE THEM!
- For Auras, it is better to wait for a decent size (for radius
 based Auras) before you use them (about 3/4 of full size is fine).
 - For counter
 based Auras, while it is best to try to leave one counter left for emergencies, deplete them where necessary. You rather die later than earlier.
 - You can always leave one Invader alive at the end of the wave to collect all your particles to refill your Aura or counters .
- Abuse Zens as much as you can, but only if they are cooled down.
- Be very careful of using a Zen when it is not completely recovered as you are significantly much more likely to die due to you standing still for much longer.
- Be very careful of using a Zen
- You can always adjust your usage of both Aura and Zen accordingly. Point is, don't hold back in using them as you can always adjust your usage later.
- For Auras, it is better to wait for a decent size (for radius
- It is better to move slowly than to move fast.
- Moving fast causes bullets to spray all around the field in apparent random patterns, and lasers to aim everywhere, making it very difficult to dodge them all.
- There is no need to wait for a full size Aura to use it.
- This is because getting a full size Aura means that you are wasting particles.
- This is because getting a full size Aura
- Offensive Auras and Zens are meant to be used at first opportunity. Don't hold back in using them as that will result in the field getting flooded with bullets quickly!
- Try not to head upfield. Stay below the centerline so that you can conserve particles.
- Particles come to you rather naturally so you'll usually get quite enough particles.
- If there is a lack of particles, push up above the centerline to collect a bit more particles then head back down.
- Try your best to aim at turrets (since your main weapon requires you to manually aim)
- Popping turrets off will give you an easier time to survive with less bullets or lasers
 on screen.
 - Always aim at the turrets that are the most dangerous (you'll learn to recognize dangerous turrets as you play).
- Popping turrets off will give you an easier time to survive with less bullets or lasers
- Turret priority elimination is very important. Learn to prioritize which turrets to eliminate first. The Invader Turrets Section will tell you everything you need to know about what to eliminate first.
- Don't let the screen shake of Invaders exploding bother you.
- Do not blame the game for its screen shakes and say that is inhibiting your ability to succeed in this game.
- A proper Aura and Zen usage is enough to clear the highest Marshal rank consistently and you do not need to perform very delicate dodging.
- You may want to readjust your touch once between Act transitions. If not, it might be a good idea to try and offset your finger slightly further away from your ship's core as you start each game. The zooming out occurs from the screen's center.
- Try not to readjust your touch too frequently, unless you need to Kappa Dodge, or you are using your Zen to pace the main weapon .
- Try not to readjust your touch too frequently, unless you need to Kappa Dodge, or you are using your Zen
- Graze! Grazing is a very important skillset in this game that is needed in higher ranks.
- The minimum distance you can graze a bullet or laser is 20 from the center of your ship core. For reference, your ship core has a radius of 2.
- Grazing allows you to gain Aura even if there is a shortage of particles on screen.
- In particular, it is very useful for defensive radius based Auras such as Bullet EMP
 , Barrier
  or Point Defence
  . It is easier to graze darts. Pellets are also good source of grazing. While it is possible to graze other types of bullets, and even lasers , it is much more difficult.
- The minimum distance you can graze a bullet or laser
- Blind Spots. In certain waves, there are certain spots that you can hide in and be safe from a whole mess of bullets approaching you.
- One way to start finding for the spots is to see the turrets. If there are many spread turrets, there is a high chance there is a blind spot somewhere.
- Low tier spinner turrets can also mean a blind spot is possible.
- Shuriken Launchers/Wave Launchers turn slowly so those can be somewhat taken as spread turrets.
- Just be careful to plan an escape route when they eventually turn to face you if you can't kill on time.
- The best way to find for blind spots is to record your runs and review them.
- It is much more difficult to find for blind spots when actively playing instead of passively watching yourself play.
- A ship of higher rarity is not always better than a ship of lower rarity. Consult the Basic Tier List to find out more about the ship you got from the Warp Gate / going to buy before upgrading it.
- The main weapon is less than half of the picture in terms of a ship's survivability. The Aura and Zen individually, as well as how well everything works hand in hand is extremely important so look out for good Aura-Zen combinations instead.
- The playing field of Act 1 is 320 (width) × 500 (height).
- The playing field expands 16 units left, 16 units right, 25 units top and 25 units bottom during an Act transition. Remember Act 5 to Act 6 have no playing field size increase.
- The hover region of all Invaders also increase correspondingly.
- While unrelated, it is easier to survive when playing with a stylus than playing with a finger.
- An Apple Pencil works best for this purpose.
- If you cannot afford it, a precision disc stylus works very well too.
- A smooth tip stylus works very well too, like mesh fiber tips.
- Be careful with silicon or rubber tips as the friction may be troublesome to handle.
- Using your finger often blocks the bullets behind you which hinders retreating from a wall of bullets.
- Record your every run and review them.
- By reviewing your own runs, you can often spot stupid mistakes on your own that can be hard to realize when under a bullet hell.
- If you are in a community, posting your runs can help others spot your mistakes as well.
- Get as big of a screen as possible to play on.
- The bigger the screen, to easier is it to spot tiny gaps in bullets.
- It is also easier for you to guide yourself through the tiniest gaps.
- Generally, the best control scheme is using the mouse control for movement.
- This offers unobstructed view of all action on screen, making dodging much easier.
- Mouse control is also the most responsive, since you can adjust your sensitivity easily. This allows you to fine tune your movement speed.
- Be careful not to set the sensitivity too high since there is a maximum speed imposed. Setting it way too high means your ship needs to catch up to the tiniest of your mouse movements, giving the feeling that the game is lagging.
- On the other hand, keyboard or controller controls have a fixed movement speed, and holding down the boost or brake buttons won't do too well in fine tuning your movement.
- While unrelated as well, playing other bullet hell games also helps (but is not necessary).
- Find games of similar genre such as Bullet Hell Monday, the Danmaku series, bullet hell shooters by Cave, etc.
- Hell (pun intended), even the original predecessor game Phoenix HD (free!) is very good practice for dodging.
- Plus, it is way more forgiving since you have health, and don't die in one hit.
- Other types of popular shmups like Sky Force and Air Attack don't help as much as the bullet density is not very high and the concept of only being able to be hit at your core is not present, since the whole ship is essentially the hitbox in these games.
General Speedrunning Tips 
- Practice, practice, practice. On the ships that you want to speedrun on. You need to know all about your ship to pull off speedrunning very well with it.
- Prepare to die. A LOT. Especially on stupid stray bullets.
- Most importantly, if you want to learn speedrunning, never give up, and don't let setbacks like these put you off.
- Prepare to even face frustration as you may die at the last wave, sometimes even last Sparrow
 , from the most stupid mistake.
- Know and/or memorize the wave compositions, and plan how to use your Auras and Zens on each wave accordingly. Consistency is one of the most important factors in speedrunning, even with the presence of RNG.
- To reduce RNG, pre-fire your offensive Auras and Zens before the wave fully arrives so that the Invaders have not enough time to separate from each other.
- The amount of time to pre-fire depends on the travel speed of the Aura or Zen .
- The amount of time to pre-fire depends on the travel speed of the Aura
- Never hold back on Auras or Zens . Use them at first opportunity.
- Ideally make sure that there is either just enough or just slightly more than enough damage being dealt to kill all the Invaders on field (with the exception of Acts 1-3 and Laser Storm
 ).
). - Having your Aura or Zen damage deal less than enough damage often wastes time since you need to use your main weapon to finish off the last Invader of the wave.
- Ideally make sure that there is either just enough or just slightly more than enough damage being dealt to kill all the Invaders on field (with the exception of Acts 1-3 and Laser Storm
- Thus, careful collection of particles is very key.
- Try your best not to overfill on Aura .
- Push back to the bottom of field and quickly launch your Aura .
- Then go back up to collect more particles.
- Try your best not to overfill on Aura
- Know your ship's main weapon .
- For example, Uninterruptible Burst weapons allow you to charge your Zen as the burst starts to go off.
- For example, Uninterruptible Burst weapons allow you to charge your Zen
- Predictive killing.
- For many main weapons , to optimize your speed, know your ship's main weapon interactions with Invaders.
- For continuous stream weapons, know how long does each Invader-class need to be exposed to your main weapon before it is destroyed
- For burst weapons, know how many projectiles of the main weapon (or the duration of exposure when talking about beam main weapons) is needed before every Invader-class dies.
- Once you know these numbers, you should quickly switch to another Invader when you know you have exposed that targeted Invader to long enough of your main weapon , with a slight bit of allowance time (<1s).
- For continuous stream weapons, know how long does each Invader-class need to be exposed to your main weapon
- For Auras and Zens , as you can start charging your Zens when you know that the Aura and main weapon (in the case of burst weapons) can kill off the rest of the wave.
- For many main weapons
- For Burst main weapons , you can attempt to charge your Zen between wave transitions to reset the burst. When the next wave fully arrives, you can then opt to cancel charging the Zen if there's not enough time, and the burst will fire immediately.
- It is easier to graze bullets from some turrets than others.
- Pellets and darts are easier to graze.
- Grazing boomerangs
 is very difficult unless they come from a T1 boomerang turret.
 - Grazing T2 or T4 tracking lasers , cone lasers or speed lasers are highly not recommended as you are more likely to die.
- You can still graze a T1 tracking laser , although the benefit generally isn't that great.
- You can still graze a T1 tracking laser
- Do not destroy these easier turrets are it is a very good opportunity to build up your offensive Auras fast. Basically, kill off only the turrets that cause trouble in dodging.
- You don't have to use your offensive Zen every wave.
- The Zen you have used may not have recovered enough
- It may be faster to use your main weapon and your Aura to finish off the next wave.
- A good guide is to abuse your offensive Zen as much as possible first.
- If you see that you are dying too much when attempting to keep on using your Zen , remove the usage of one Zen and try to re-allocate the usages of the rest.
- If you manage to complete the run still quite easily, then experiment with taking out one Zen usage and see if you go faster.
- The Zen
- Lightning Fast Bullet Vector Calculations. You need to be able to very quickly calculate where the remaining bullets on field (after the last Invader of the current wave dies) are headed for and find a safe spot where no bullet paths will intersect your planned core location.
- This is to charge Mega Bombs
 or Mega Lasers
  safely and very quickly.
 - Obviously, boomerangs are going to be the hardest to master their predictive movement.
- If you wish to improve in this aspect, try charging Mega Bomb or Mega Laser mid-wave (when the wave has fully arrived and started firing bullets) to practice.
- This is to charge Mega Bombs
- If you are using a Shield Breaker ship, try to let your main weapon strip the shield before launching any form of offensive Aura against it.
- This is because Auras and Zens have no affinity and do not deal bonus damage to shields, unlike Shield Breaker weapons.
- Due to the non-zero charging time of Zens , Zens have to be used when the wave first comes in.
- It is not always true, however, especially for quick charging offensive Zens like REMP
 .
.
- It is not always true, however, especially for quick charging offensive Zens like REMP
- This is because Auras
- Try to aim your Auras and Zens directly at the cockpit of Armored Invaders since that will bypass armor damage reduction, unless you have an apex that has an Armor Piercing Aura or Zen.
- If you are using a non Armor Piercing main weapon (in the case of community missions), aim your main weapon at the cockpit of Armored Invaders too.
- If you are using a non Armor Piercing main weapon
- If you are using a ship that has a very fast Zen charge time
 like Reflex EMP , during wave transitions, push yourself all the way to the bottom of the screen. You can push up when the wave comes where necessary.
- This allows you to stack your ship's main weapon projectiles and boost DPS very briefly during the upward push.
- This allows you to stack your ship's main weapon
- Grazing a pellet MIRV
 is possible. If you are right beside an MIRV just milliseconds before it explodes, you can graze all 30 of its released pellets simultaneously and this is enough to charge a near full Aura from an empty Aura.
- However, it is extremely risky and difficult, so only attempt this if you are a skilled player and looking to further your speedrunning skills.
- Always go as near as possible to Invaders, going as far to Invader riding.
- This minimizes the travel time of your main weapon , or how long your offensive Auras and Zens take to reach Invaders.
- Be careful not to overkill however, unless it is desirable due to surplus of particles, or simply being just much faster.
- This minimizes the travel time of your main weapon
- Always experiment between going upfield to soak up particles and going near to Invaders.
- Sometimes, it may be faster to overflow on particles but achieve a much faster kill rate.
- At other times, it may be more beneficial to be slightly more downfield.
- Record your every run and review them.
- By reviewing your own runs, you can often spot stupid mistakes on your own that can be hard to realize when under a bullet hell.
- If you are in a community, posting your runs can help others spot your mistakes as well.
- A little unrelated to gameplay, but it is generally easier to speedrun with a stylus than with a finger.
- The best type of stylus is a smooth tip stylus, like a mesh fiber tip.
- A precision disc stylus works fine too (you find it better as well since you may see your core much more easily than a mesh fiber tip), but beware that contact will break beyond a certain angle for such stylus.
- Do not use a rubber or silicon tip as those have friction which hinders sliding across your screen quickly.
- A stylus allows you to move around much more quickly, as well as not potentially hurting your finger from the friction.
- A medium sized screen is better than a huge screen for speedrunning.
- You need to slide less to make rapid re-positioning moves compared to a larger screen.
- By medium size, usually the size of an iPad Mini works best.
- Anything bigger than an iPad Mini will have problems as the screen is too big for you to be able to see all the action happening on the screen at once.
- A bigger screen also means it's harder to calculate bullet vectors (as mentioned above).
- This is the reason why even though an Apple Pencil works best for speedrunning.
- The Apple Pencil works on iPads or iPad Pros, but the screen size makes it hard to recommend.
- If you are intending to use a smaller screen, a stylus would be highly recommended, as your finger might end up blocking a lot of the action and make it difficult to dodge.
- Otherwise, the best control scheme is using the mouse control for movement.
- This offers unobstructed view of all action on screen, making it easier to move quickly around the field without blindly crashing into bullets.
- Mouse control is also the most responsive, so you can adjust your sensitivity to allow you to move quickly.
- Be careful not to set the sensitivity too high since there is a maximum speed imposed. Setting it way too high means your ship needs to catch up to the tiniest of your mouse movements, giving the feeling that the game is lagging.
- On the other hand, keyboard or controller controls have a fixed movement speed, and holding down the boost or brake buttons won't do too well in fine tuning your movement.